Depreciation
In this procedure you can depreciate fixed assets in the register. In addition to scheduled depreciation, calculated depreciation is also handled.
Data in the procedure is based on information about the fixed assets as well as settings for their fixed assets groups.
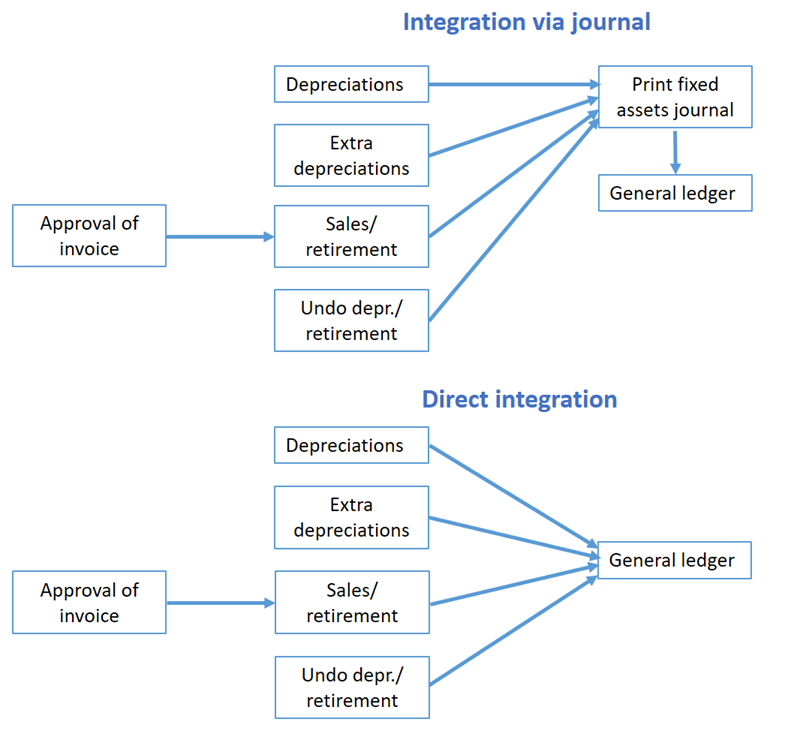
When scheduled depreciation is done, the residual values and accumulated depreciation will be updated. At the same time a basis for recording/booking of the depreciation is created. By using a setting in the procedure Voucher number series/Journals you can choose if depreciation should be booked directly in connection with executing the depreciation or if it should be recorded via the procedure Print fixed assets journal.
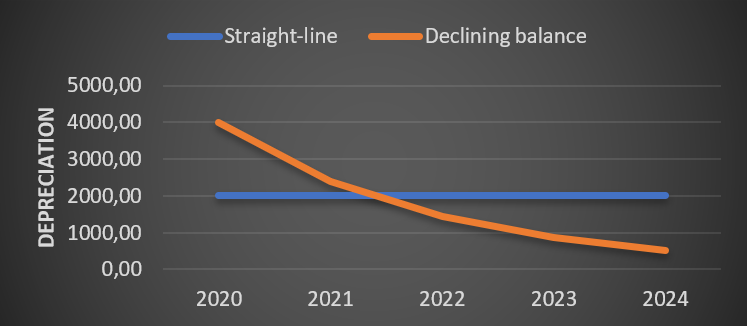
Comparison between scheduled straight-line and declining balance depreciation.
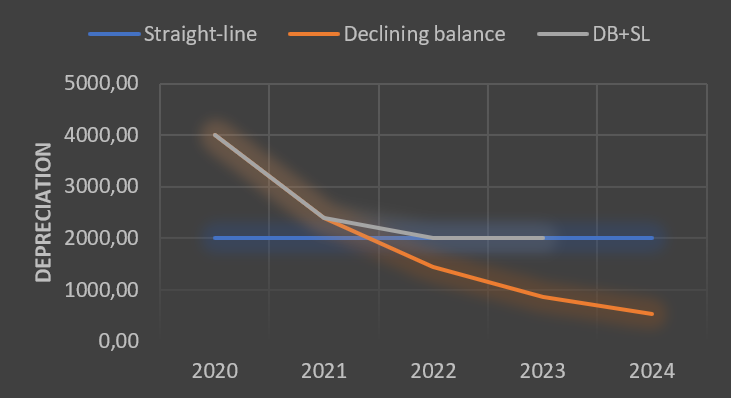
Comparison between scheduled Straight-line, Declining balance, and Declining balance + Straight-line depreciation.
See detailed calculation examples for Declining balance depreciation and Declining balance + Straight-line depreciation.
The system calculates depreciation either based on months or days. This is determined by the system setting called Depreciation is based on.
If the system setting Method for scheduled depreciation is set to Allocate residual value over the remaining depreciation period, the calculation will be based on:
- The fixed asset's residual value
- The remaining depreciation period/percent
- The number of months/days to be depreciated now.
Formula for calculation of depreciation (where the depreciation is based on months) is: residual value ∕ months left × months depreciation.
Formula for calculation of depreciation (where the depreciation is based on days) is: residual value ∕ days left × days depreciation.
Example when depreciating based on months:
Acquisition value: 60,000
Depreciation period: 5 years (60 months)
Depreciation month 1: 60,000 ∕ 60 × 1 = 1.000
Depreciation month 2: 59,000 ∕ 59 × 1 = 1.000
Depreciation month 3: 58,000 ∕ 58 × 1 = 1.000
If the system setting Method for scheduled depreciation is set to Percent of acquisition value, the depreciation will be based on:
- The fixed asset's acquisition value
- Depreciation percent
- The number of months/days to be depreciated now
The declining balance depreciation method calculates the depreciation based on the object’s residual value, with a higher rate of depreciation at the start of the object’s financial life, which gets lower over time.
This method is a combination of Straight-line and declining balance depreciation, and is used in Poland, for example. With this method, the depreciation starts with the declining balance method until the value reaches the point where the straight-line method is higher. The method is then changed to straight-line depreciation.
During calculated depreciation, a calculation of depreciation will instead be based on the settings made on the fixed assets groups regarding calculated depreciation. As opposed to scheduled depreciation, the calculated depreciation is not regulated by law. It takes place based on internal purposes. These normally concern bases for price calculations and profitability calculations and with a basis of the asset's replacement cost instead of acquisition value.
Formula for calculation of depreciation (where the depreciation is based on months) is: (depreciation basis × months of depreciation) / (12 × depreciation %).
Formula for calculation of depreciation (where the depreciation is based on days) is: (depreciation basis × days of depreciation) / (365 × depreciation %).
Work flow in the procedure
First you select which depreciation type is to be done by selecting list type. If you choose scheduled depreciation, then you can enter to which date depreciating should be done. The default date is up to and including the last day in the current accounting period.
You can also make other selections, for example by fixed assets group. When you have loaded data to the list then you can see the depreciation result under that tab. The information displayed is each fixed asset's depreciation. The system always depreciate with basis in each separate asset's most recent depreciation. Regarding new objects, depreciation is made based on the date saved in the field Depreciation start. Fixed assets with the status options Sold/Retired and Investment in progress are not included in the lists.
At the bottom of the tab you see a posting box where you can see how depreciation will be posted per object. You can also activate the setting Total accounting order. This means you will see a total by account which displays how all fixed assets are posted.
In the list you select which journals to save or to save and print the journal. If you use direct integration it is only possible to save. In that case the depreciation will automatically be recorded when you save. If you use regular integration, the procedure Print fixed assets journal will open when you choose to save and print the journal. Both during direct integration and integration via journal, a voucher is always created for the entire depreciation. On the other hand, each asset's postings are specified on separate rows in the voucher. On the row the asset's number is saved for traceability in the general ledger. In the Voucher number series/Journals procedure you can configure if the asset number (object number) should be saved on all rows or only for balance accounts.
To the right of the List tab there is a separate tab called Extra depreciation. This is only available if you selected the list type Scheduled depreciation. By using this tab it is possible to depreciate extra for a separate fixed asset (similar to manual outgoing payment in the Outgoing payments procedure).
Voucher number series/Journals
To be able to book/record what has been done in this procedure it requires that you have configured settings regarding integration to the general ledger. These settings are configured via the Voucher number series/Journals procedure. The fixed assets register has a separate journal number series in that procedure. The journal number continues year after year as for other journals, but the voucher number which it is linked to starts over after you change year.
Scheduled depreciation
By using this list type you can do scheduled depreciation. In a separate tab you can also do extra depreciation. The list can be presented according to standard with depreciation per asset on each row or you can group the list by fixed assets group
Calculated depreciation
By using this list type you can do calculated depreciation. The list can be presented according to standard with depreciation per asset on each row or you can group the list by fixed assets group
Budgetary depreciation
Using this list type, you can simulate depreciation e.g., for the next accounting year, to help with budgetary planning.
The presentations determine how the selected list should be displayed/presented. For example if it should be presented as grouped or as total. There are some standard presentations included in the program.
In most procedures where you can load lists, it is possible to create your own presentations. This is done under Presentations in the backstage of the procedure in question. If you create your own presentation you can for example choose if it should have a drilldown function and a drilldown filterering.
You can select which columns the list should consist of, and for each of the columns you can configure grouping, sorting, aggregation, and if the column should be shown in chart form and if it should be printed. Additionally you can also make printout settings, chart settings, and settings regarding extra aggregation.
Read more about this in Presentations.
In a list procedure there is always a tab called Selection where you can select data records in different intervals from the database. The data records are then loaded by using the Load button  in the toolbar of the procedure.
Under Selection rows in the backstage of the procedure, you can choose which selection rows that each list type should have, under the Selection tab in the procedure. In the List type field you select for which list type you want to customize the selection rows.
One table shows selection rows possible to select and one one table shows the selected selection rows. You can add, delete, or move selection rows by dragging and dropping the selection rows with your mouse pointer.
Using the Save button  you save the selected selection rows.
Read more about this in the Selection topic.
You can automate the running of this procedure with the Agent option. Read more about The Agent can help make your processes more efficient.


