Create test databases
Monitor ERP Installation Manager is used to add test databases which are copies of company databases. The test databases are added under the Test databases tab. They are used for training purposes or for different tests that should not be performed in the company databases.
When a test database is added, a section for the test database is also created in the configuration file MonitorCompanyConfiguration.json. The file can be found in the Monitor server’s installation folder (normally C:\Program Files (x86)\Monitor ERP System AB).
An existing text database can, if necessary, be replaced with a company database to obtain a recent copy to use as a test database.
If the databases are on SQL Anywhere, this can be done manually with the button Copy new test database  on the Test databases tab. An existing test database can also be copied regularly via a scheduled copying task. This can be configured when you create the test database, or afterwards, in the Installation manager.
If the databases are on SQL Server, the script TestCompanyCopy.sql is used to create a scheduled run of a copying task in Microsoft SQL Server Management Studio. You should have received the script from Monitor ERP System AB.
- Existing user accounts are included from the company database. However, test databases do not require user licenses so you are free to add additional user accounts in your test databases.
- Scheduled and automatic events will be deactivated by default in test databases, but can be run manually. This applies to the following events: net requirement calculation, forwarding of authorization and reminder of authorization via e-mail (when EIM is used), loading from e-mail inboxes (e.g. in CRM), Agent tasks, and monitoring tasks. The search indexing in test databases will also be turned off. The purpose of these deactivations and turning off the search indexing is to save system resources on the server.
- In the installation manager you go to the Test databases tab and click the Create new test database button
 .
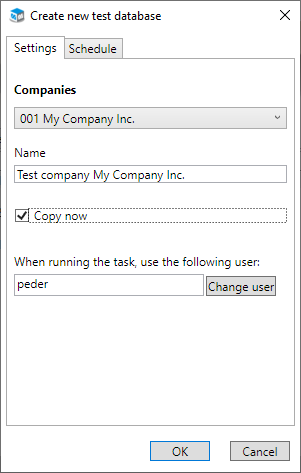
. - In the dialog shown, select Company under the Settings tab (that is, the company database you want to copy to test database).
- After having chosen Company, you can change the Name on the test database. The default name is "Test company [Your company name]".
- Decide if the alternative Copy now should be selected (default). This will copy the company database to the test database directly when it is created. This can also be done using the Copy new test database button
 under the Test databases tab.
 - When the Copy now setting is activated, enter Use the following user account when running the task. By default, this is the user logged in to Windows on the computer. However, you can enter a different user with the Change user button.
- If you wish to create a scheduled copying task for the test database, select the Schedule tab and move on to point 6, below.
Otherwise, close the dialog with the OK button and the test database is added. A section for the test database is now created in the configuration file MonitorCompanyConfiguration.json. - If the Copy now setting was activated, you can now enter Password for the user who is selected to run the activity (see point 12 below). A manual copying task called "Copy new data ([test database number])" is created and is shown under the test database. In the Windows Task Scheduler the corresponding manual tasks are also created.
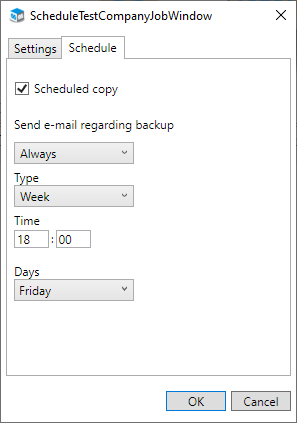
- Under the Schedule tab you activate Scheduled copy of the test database. The purpose is to get a current copy of the production/actual/live database on a regular basis which you can then use as test database. You can also add scheduled copying tasks later (see Add scheduled copying task below).
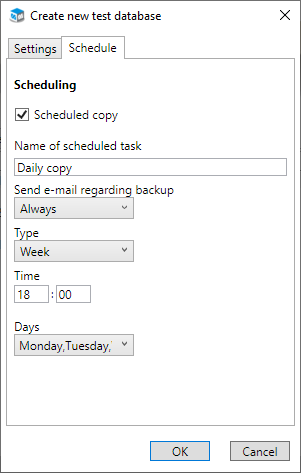
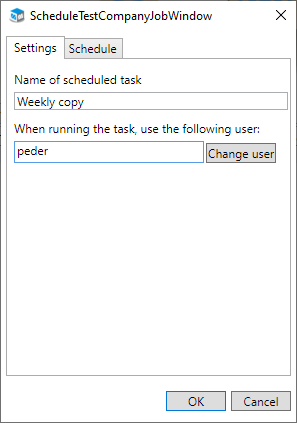
- Enter a Name of scheduled task.
- Configure the Send e-mail regarding backup setting. Here you decide if an e-mail should be sent Always, In case of error, or Never. The default option is Always and this means an e-mail will always be sent when a copying task has been performed. If you select the In case of error option, an e-mail is sent only if the copying task failed. Choose the Never option if you do not want an e-mail to be sent regardless of if the copying task has been performed or if it has failed.
You configure general e-mail settings (such as, receiver, sender, and e-mail server) via the button which you find under the Backup tab, and these apply to all copying tasks.
 - Select Type. The options are Week, Month, and Last day of the month. Type is by default set to Week.
- Enter a Time and the Days or Months on which the copying task should be performed. If Type has been set to Month, you also get to select a Date in the months when the copying task should be performed.
- Click OK in the dialog in order to add the database. A section for the test database is now created in the configuration file MonitorCompanyConfiguration.json.
- Finally, you must enter the Password for the selected user who will run the task. Then click OK in this dialog.
The scheduled copying task is then created, and shown under the test database with the name you entered for the scheduled task. In the Windows Task Scheduler the corresponding scheduled tasks are created.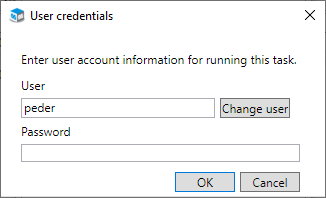
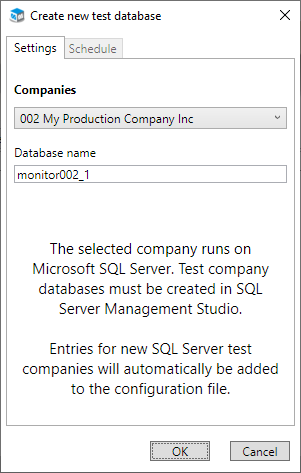
- After you have selected Company, you can only change the Database name which the test database should have on SQL Server. The default name is "monitor[company database number_test database number]".
- Click OK in the dialog. A section for the test database is now created in the configuration file MonitorCompanyConfiguration.json.
- Run the script RestoreMssqlDatabase.sql in Microsoft SQL Server Management Studio to create the test database on SQL Server. You should have received the script from Monitor ERP System AB.
- Read more under Add scheduled copying task, below, if you want to create a scheduled copying task for the test database on SQL Server.
-
If you want to add a scheduled copying task for a test database afterwards, select the test database under the Test databases tab and click the Add scheduled copy button
 (this button is active if you select the test database).
 -
Name and configure the copying task you want in the respective tabs Settings and Schedule and click the OK button.
- If you want to add a scheduled copying task to a test database on SQL Server, use the script TestCompanyCopy.sql and create a scheduled run of the copying task in Microsoft SQL Server Management Studio. You should have received the script from Monitor ERP System AB.
This applies if the test database is on SQL Anywhere.
-
If you need to change a scheduled copying task, you select the copying task under the test database under the Test databases tab and click the Edit copy button
 (this button is active if you mark a copying task under the test database).
 -
Make the changes you wish to do under the respective tabs Settings and Schedule and then click the OK button.
-
When you have made the changed you must also transfer these changes to the task in the Task Scheduler in Windows. This is done using the Update the scheduled tasks button
 under the Test databases tab.
Users who are logged in on the test company will automatically become logged out from Monitor ERP when the copy to the test company takes place. This is good to know, especially if you use scheduled copying.
