Presentations (in list procedures)
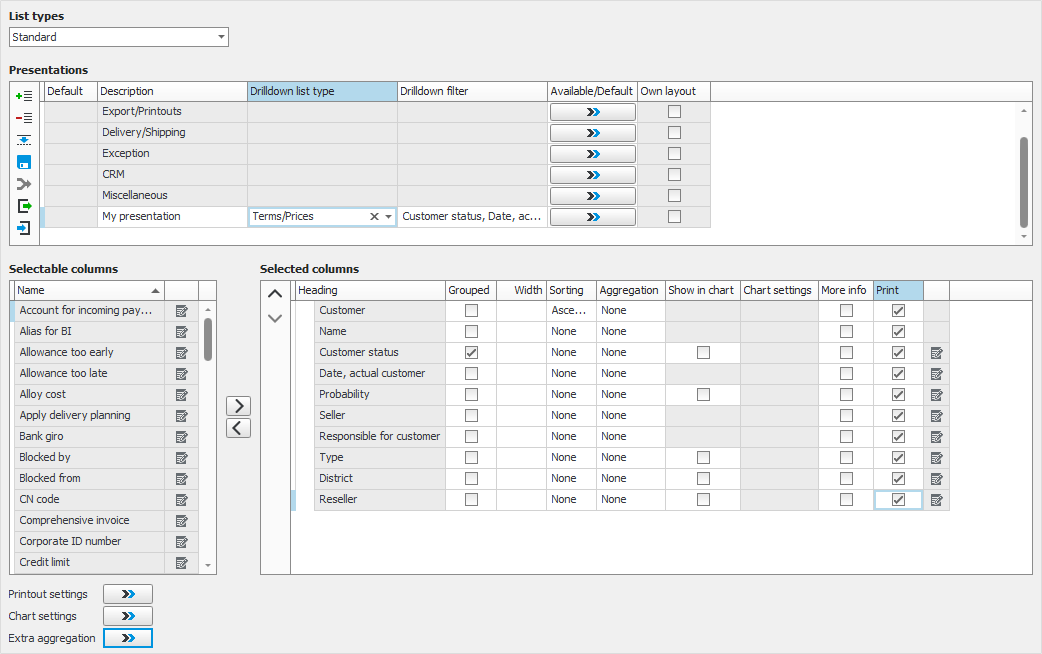
Under Presentations in the backstage of the procedure you can create own presentations for different list types. In order for you to be able to complement with own presentations there must be standard presentations for the list type in question under the Selection tab. In the image below you see an example of presentation settings.

You select a List type as data source of which to create presentations. In the Presentations table you see the presentations that are included as standard for the selected list type.
A new presentation can either be created as an empty view by using the button Add new row at the end  or as a copy of an existing presentation using the button Copy presentation
  .
.
For a presentation you have added you can configure Drilldown list type and Drilldown filter. Read more about Drilldown in lists.
You can also select the roles, user rights groups, or users, for which the presentation should be Available/Default.
You can also see if there is a saved Own layout. In that case you can choose to include the layout in the presentation by using the button Include own layout in presentation  . "Layout" refers to which columns to show, column width (in pixels) and the order of the columns. If you choose to include own layout in the presentation, the saved layout will be deleted.
Here you find a table with Selectable columns and a table with Selected columns. Using the buttons between the tables you can add  or delete
  columns. You can also move the selected columns around and change the order of them: up
  or down
  in the list (moving the column to the left or to the right in the finished list). You can also add, delete, or move columns by dragging and dropping the columns with your mouse pointer.
For each column you can configure grouping, column width (in pixels), sorting, and aggregation*. You also configure if the column should be shown in charts, if the column initially should be placed under the Mer info button, and if the column should be included when printing.
* Read more about Aggregation of columns.
Regarding the width of the column it might be difficult to know which value to enter (in pixels) and how wide you want each column to be. Therefore it is possible to load column width settings from the list. First you load the list type and presentation you want to use as a starting point. This is done the normal way by clicking the button Load  (Ctrl + L) on the toolbar in the procedure. Then you adjust the column widths directly in the list. After that you save the layout with the Layout button
  on the toolbar. Then you go back to Presentations in backstage and copy the presentation. This way the adjusted column widths of the list will be included.
Under the column tables you can also configure Printout settings, Chart settings, and settings for Extra aggregation. Note that the Print setting determines if the column is included upon Export to Excel (raw data).
By using the Save button  you save the presentation so it is still there the next time you start the procedure.
Using the Export button  you can export the presentation to a JSON file (*.json). This will make it possible for other users to load the presentation using the Import button
  . This way they do not have to create the same presentation.
An exported presentation can only be imported in the procedure it was created in.


