Create and schedule backup
 PostgreSQL
If PostgreSQL is used, backups of the company databases are performed using the PostgreSQL Backup Manager tool.
PostgreSQL Backup Manager is a tool used to configure backups for PostgreSQL databases running on Windows. The tool automates backups using PostgreSQL's built-in pg_basebackup tool and includes features such as scheduling, notifications, and post-backup automation.
Installation
PostgreSQL Backup Manager is installed and updated using Monitor Installation manager. The installation creates a shortcut on the desktop. If the shortcut isn’t available, you can start the application manually. The default location for PostgreSQL Backup Manager is: "C:\Program Files\Monitor ERP System AB\MONITOR Postgres Backup\Monitor.Postgres.Backup.Manager.exe".
Status & Log
The Status & Log tab shows the current status for your backup system and provides a history of the latest backups.
-
Backup Agent Status: Here you can see whether Backup Agent Service has been installed and run on your system. The statuses here are Running, Stopped, Paused, and Not installed.
-
Last Backup: Shows the date and time that a backup was last performed.
-
Last Duration: Here you can see how long it took to perform the backup.
-
Next Backup: Here you can see when the next scheduled backup will be performed.
-
Open logs folder: Here you can open the folder that contains detailed backup logs. These are saved for 30 days.
-
Backup History: Here you can see that last 50 backups. You see their status, how long it took, and what type of backup was done.
-
Refresh: Using this button, you can load the current status and backup history.
Settings
Under this tab you can configure basic settings and connection information for PostgreSQL.
-
Backup directory: Here you should enter the path in Windows where backup files should be created (e.g. C:\Backups\PostgreSQL). Ensure that the selected location has enough free disk space.
-
PostgreSQL binaries directory: Here you can enter the path to your PostgreSQL installation’s bin folder, where pg_basebackup.exe is (e.g. C:\Program Files\PostgreSQL\18\bin).
-
Host name (PostgreSQL): Here you can enter the host name or IP address to your PostgreSQL server. Enter “localhost” for local installations.
-
Port: Enter the server port for PostgreSQL. The default value here is 5432.
-
Login username (PostgreSQL): Here you enter the user name for the user account in PostgreSQL that has “replication privileged” or is a super user. The default user name is ”Postgres”.
-
Login password (PostgreSQL): Here you enter the password for the user account in PostgreSQL. This is encrypted and stored securely.
Click Save Settings to save your changes.
Scheduling
Under this tab you can define the scheduled backups.
-
Full backup time: Here you enter the time when the daily backup should be run, a so-called ”base backup”. Enter the value using a 24-hour time format.
An initial backup is carried out immediately once the installation is complete. Following backups are performed according to schedule.
Click Save Schedule to apply the schedule.
Notifications
Use this tab to configure email notifications for backup events. You can create multiple notification rules with different triggers.
-
Name: Enter a descriptive name for the notification rule, for example "Email to IT" or "Alert for Failed Job".
-
Trigger when: Select when the notification should be sent.
-
Backup succeeds: Sends a notification when a backup has completed successfully.
-
Backup fails: Sends a notification when a backup encounters a problem.
E-mail methods
The application currently supports SMTP only.
SMTP
-
SMTP Host: Enter the server address here, for example smtp.gmail.com or smtp.office365.com.
-
SMTP Port: Here you enter the server port to be used. Ports that are usually used are 587 for TLS, 465 for SSL, and 25 for unencrypted.
-
SMTP Username: Here you enter the username for the e-mail account.
-
SMTP Password: Here you enter the password for the e-mail account or the app-specific password.
-
Use SSL/TLS: This alternative activates an encrypted connection, which is recommended.
-
Sender E-mail: Here you write the e-mail address which should be shown as the user.
-
Recipient E-mail: Here you write the e-mail address of the recipient of the e-mails.
Test Notification: Use the Test Notification button in the dialog to verify the configuration of your e-mail before you save.
Click Add New Notification to create a new notification rule. Use the pen icon to edit and the trash can icon in the Actions column to manage existing notifications.
Advanced
Post-backup hooks allow the backup process to run one or more external commands after each backup has completed. Hooks are useful for automating follow-up tasks such as copying a backup to another location, uploading it, or sending a custom notification. The list displays all configured hooks and their settings.
Important: The command path must point to a valid executable file or script on the computer where the backup is running. Make sure that the backup service account has permission to launch the command and access any folders or network locations used by the hook.
How do post-backup hooks work?
-
A hook runs once a backup has been performed, regardless of whether it was successful or not.
-
You can configure several hooks.
-
A hook runs as per a so-called “fire-and-forget” model, meaning that it doesn’t block the back up schema.
-
Each hook runs the command you configure and gets information on the completed backup.
Add New Hook
Click Add New Hook to open a dialog box where you can configure a new hook. The dialog contains the following settings:
-
Enabled: Here you enter if your hook should be run or not.
-
Command: Here you enter the path to the executable file or script that should be run.
-
Parameter Mode: Here you select how the backup information is forwarded to your hook. The alternatives are CommandLine and EnvironmentVariables.
-
Timeout (seconds): Here you enter the maximum amount of time that your backup hook is allowed to run before the run is ended.
Parameter Modes
CommandLine: Backup information is given to the command in the form of a CommandLine argument.
| Argument | Description | Example |
|---|---|---|
| --status | Backup result: Success or Failure. | --status Success |
| --backup-directory | Path to the backup directory. | --backup-directory E:\Backups\base_backup |
| --start-time | Backup start time in ISO 8601 format (UTC). | --start-time 2025-06-12T02:00:00.0000000Z |
| --finish-time | Backup finish time in ISO 8601 format (UTC). | --finish-time 2025-06-12T02:15:00.0000000Z |
| --backup-type | Type of backup performed: Full or Incremental. | --backup-type Full |
| --error | Error message if the backup failed. Empty when the backup succeeded. | --error "" |
| --test-run | True if this is a test execution, otherwise False. | --test-run False |
Environment variables
EnvironmentVariables: Backup information is forwarded to the command via EnvironmentVariables.
| Variable | Description |
|---|---|
| MONITOR_BACKUP_STATUS | Backup result: Success or Failure. |
| MONITOR_BACKUP_DIRECTORY | Path to the backup directory. |
| MONITOR_BACKUP_START_TIME | Backup start time in ISO 8601 format (UTC). |
| MONITOR_BACKUP_FINISH_TIME | Backup finish time in ISO 8601 format (UTC). |
| MONITOR_BACKUP_TYPE | Type of backup performed: Full or Incremental. |
| MONITOR_BACKUP_ERROR | Error message if the backup failed. Empty when the backup succeeded. |
| MONITOR_BACKUP_TEST_RUN | True if this is a test execution, otherwise False. |
SQL Anywhere
Create backup task
-
Go to the Backup tab in the installation manager and click the button New backup task
 .
.
-
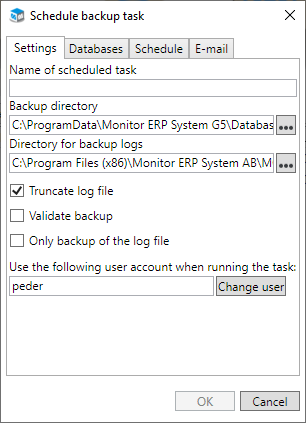
Under the Settings tab you enter a Name of scheduled task.
The default Backup directory for a new backup task is according to Standard path for backup files: in the Settings tab. This is where the backup files* are saved. You can select a different backup directory for this backup task.
The default Directory for backup logs corresponds to the Standard path for backup logs in the Settings tab. Text files with logs of each backup run are saved here.
Truncate log file (default) means the relevant log file "monitor.log” for the database is cleared of transactions after the backup task has been run. Truncation is recommend in order to minimize the size of the log file.
Validate backup (default) means that the backup files are validated after the backup task has run. This validation is performed in a separate session of the database server and checks that the backup files are not corrupt.
Only backup of the log file means that only the log file "monitor.log" is included in the backup. A reason to activate this setting may be that you need to run backup tasks very frequently (e.g., every hour), because there are many transactions made in the database in a short time. Then you can choose to only backup the log file (which is quick to run a backup task on). If a reset should be necessary, it is possible to recreate the database by using the most recent regular backup task of the database file and log file, plus all the separate log files in chronological order for this backup task.
Please note! A backup task which only backups the log file should be created as a separate backup task. For this backup task there must be a regular backup task which does not have this setting activated, and which runs, for example, 1 time per 24 hours.
Enter Use the following user account when running the task. By default, this is the user logged in to Windows on the server. However, you can use the Change user button in Windows to enter a different user. You can then enter the user’s password.
-
Under the Databases tab you mark the database to include in the backup task. This will activate the OK button. By clicking that button you will create a manual backup task. You must then enter the user’s password (see point 7 below). You run a manual backup via the button Start
 under the Backup tab in the installation manager.
-
If you want to create a scheduled backup task, go to the Schedule tab instead of clicking the OK button. There you create the scheduling of the backup task. An alternative that you subsequently use the Edit backup task button
 under the Backup tab.
Under the Schedule tab you activate Scheduled task.

Select Type. The options are Week, Month, and Last day of the month.
Enter a Time and the Days or Months on which the backup task should be performed. If Type has been set to Month, you also get to select a Date in the months when the backup task should be performed.
-
Under the E-mail tab you configure if and when e-mail should be sent in connection to when the backup task is run.

Configure the Send e-mail regarding backup setting. Here you decide if an e-mail should be sent Always, In case of error, or Never. The default option is In case of error. This means an e-mail is sent only if the backup task failed. If you select Always, it means an e-mail will be sent also in cases when the backup task was been performed. Choose the Never option if you do not want an e-mail to be sent regardless of if the backup task has been performed or if it has failed.
Configure the E-mail setting to Standard or Manual. Standard is the default option and this will use the general e-mail settings for receiver and subject. If you select Manual, you can change this information in the To and Subject fields for the backup task in question. You can enter more than one e-mail address by separating them using semicolon (;) in the To field.
-
Click OK in the dialog in order to create the backup task. A scheduled task is then also created in the Windows Task Scheduler.
-
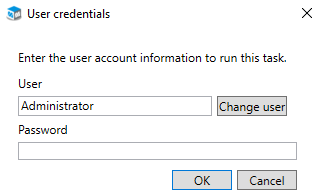
Finally, you must enter the Password for the selected user who will run the task. Then, click OK.
* The backup files are copies of the current database file "monitor.db" and the current log file "monitor.log” for the database. An additional copy is also created here of the current log file, with todays date and time in the file name; "monitorYYYY-MM-DD HHMMSS.log". This means that log file will never be overwritten when the backup task is run the next time. All files are saved in a sub-folder with the same name as the actual (live) database folder, for example "001".
Please note! The backup files "monitor.db" and "monitor.log" are overwritten each time a backup task is run! That is why it is important to always backup the entire backup folder after the backup task has run. Save the backup copies in a protected location.
Change scheduled backup task
- If you need to make changes to an existing backup task, you select the task under the Backup tab and click the Edit backup task button (this button is active if you mark a backup task).
- Make the changes you wish to do under the respective tabs Settings, Databases, Schedule, and E-mail, and then click the OK button.
- When you have made the changed you must also transfer these changes to the task in the Task Scheduler in Windows. This is done using the Update the scheduled tasks button
 under the Backup tab.
General backup settings
The general backup settings concerns notifications sent via e-mail when running backup tasks, and when copying tasks for test companies. Here you can also configure settings regarding communication with your e-mail server. You only need to configure these settings once. These settings will then apply by default for all backup tasks and copying tasks for test companies, that you create.
- Click the Backup settings... button
 at the bottom left corner of the Backup tab in the installation manager.
 -
Under the Notifications tab you can activate that notifications should be sent via e-mail to one or several receivers which have entered in the field. You can enter more than one e-mail address by using a semicolon (;) in the field to separate them. With the Test e-mail button you can send a test e-mail to receivers to test the function. Receiver/recipient of notifications can also be entered per backup task.

Detailed information about successful and failed backup job runs is stored in a log file for each backup job, which can be accessed using the Logs
 button on the Backup tab.
 - Under the tab called E-mail settings you configure which Server (e-mail server) and Port to use to send notification via e-mail. You also enter a User name and Password for a Windows account which have permission to send e-mail via the entered e-mail server. In the Sender address field you enter an e-mail address which will function as the sender of the notifications. Activate Use SSL if the e-mail server requires it. Then you should also enter which Port the e-mail server uses for SSL.

- Click the OK button when you have completed the general backup settings.
SQL Server (MSSQL)
If Microsoft SQL Server is to be used, backup of the company databases is run in the regular tool for database backup on SQL Server.