Export e-invoices to KSeF
The KSeF function in Monitor ERP enables you to easily setup and send e-invoices to KSeF (Krajowy System e-Faktur). You don't have to order this functionality if you are using the Polish country package, you can simply activate it yourself directly in Monitor ERP. In this topic you can learn more about which settings need configuring.
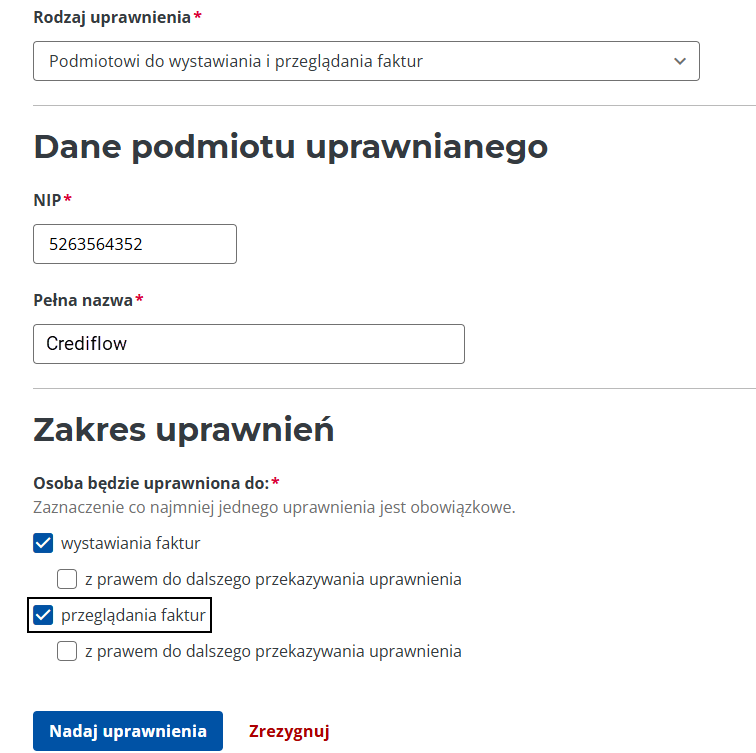
Upon activating the e-invoice functionality, an account is automatically created for you with our partner, Crediflow. Crediflow is the operator that manages the distribution of the e-invoices. Port 443 or 80 must be open for outgoing traffic in your firewall, so that your system can communicate with Crediflow.
To export e-invoices to KSeF you need to configure the following settings:
-
Open the Export tab in the Settings for export/import procedure.
-
Select the export type KSeF.
-
Tick the Active checkbox to activate the KSeF function.
-
In Path to file, you can enter the path to the directory where you would like to save the export files (XML) after being uploaded to the operator.
-
Enter a file name. The following variables can be used:
-
%i – invoice number
-
%c – corporate ID number
-
%C – company name
-
-
Select Authentication method. The following options are available:
-
Token – If you select Token, you must enter the token generated in KSeF’s Taxpayer Application in the Token field.
-
Crediflow authorization – If you select this option, you must grant our partner Crediflow authorization in KSeF’s Taxpayer Application to issue and view invoices in KSeF. When Crediflow authorization is selected, the partner authenticates in KSeF using its own authentication certificate. Log in to KSeF’s Taxpayer Application and authorize Crediflow by entering their NIP and company name.
You then need to generate tokens in KSeF based on which environment you are using, the production environment or the test environment, and paste them into the Token field, or authorize Crediflow in the respective environment. Please note that in one database, for a single VAT ID, KSeF export can only be activated for either the test environment or the production environment. -
-
Select Schema version for generating e‑invoices to KSeF.
-
Via the Offline certificate field, you can upload, modify, or delete the file containing the company’s offline certificate. Only files with the .pfx extension are accepted. You need to combine the private key file and the public key file into one file. Based on the certificate data, a verification link (QR code) will then be generated for customer invoices sent to Crediflow which in turn will then send them on to KSeF. You can use this QR code on the invoice printout if you need to send an invoice to a customer when KSeF is unavailable (e.g., during maintenance or due to technical issues). In the Expiration date field, specify the certificate’s expiration date. In the Password field, enter the password for the private key. This is the same password that you set for the .pfx file.
-
If you work with multiple warehouses, you can decide which warehouses will transfer e-invoices to KSeF. Under Warehouse settings, tick the checkbox Don't send to KSeF for any warehouse that you would like to exclude from transferring e-invoices.
-
In Invoice fetching settings, use the Starting date field to specify the date from which supplier invoices will be imported from KSeF when e-invoice import via CrossState is activated. You can set a date up to 3 months in the past or up to 1 month in the future (for planned activation). If no date is specified, supplier invoices will be imported 31 days back from the activation date. If the KSeF connection has already been activated for export but e-invoice import has not yet been used, you can enter a date in the Starting date field and update the connection by selecting Renew KSeF connection.
-
Decide which KSeF environment you are working with:
-
Production – KSeF Taxpayer Application (production version)
-
Test – KSeF Taxpayer Application (pre-production/demo version)
It must be the same environment in which the token was entered or where permissions were granted for Crediflow.
-
-
You can decide whether users , groups of users, or specific roles should be notified about the status of invoices being sent to KSeF. You can select recipients by clicking the Notify button.
-
If you don't already have an account with Crediflow, you need to create an account by clicking the Create account button. Make sure the company information is correct, and enter a contact person and that person's contact information including their e-mail address.
Create account
Enter contact information and tick the I have read and accepted the terms/conditions for this service checkbox. The account will then be created when you click the OK button. The account is created via an API connection to Crediflow. If everything works correctly, you will automatically receive your company ID. The account registration is now complete. Remember to save.
Activate the KSeF connection
Use this button to activate the KSeF connection for your account based on the chosen authentication method.
Renew the KSeF connection
If the KSeF connection is active, use this button whenever you enter a new token, change the authorisation method, or add an offline certificate to activate it for your account.
Update account
If you have an account with Crediflow but need to update your company information, you can use this button to do so.
Deregister account
If you have an account with Crediflow, you can use this button to deregister the account. Please be aware that performing this action cancels the KSeF connection for both exporting and importing invoices.
Deactivate connection
If the KSeF connection is active, use this button to deactivate it. Please note that this action cancels the KSeF connection for both invoice export and import.
Connection test
Use this button to verify that your KSeF connection works correctly and see which permissions it covers. The results are shown in the message window.
When you approve an invoice that requires approval in KSeF, you can either send the invoice for approval to KSeF immediately or do it later. You can immediately send the invoice to KSeF by approving it in Review/Approve invoice or in Register invoice directly.
If you want to request approval later, you can do so in the KSeF approval procedure.

In the KSeF approval procedure, you can also check the status of the invoices sent to KSeF. The procedure contains two list types:
-
Send invoices for approval
-
Check status for sent invoices
Send invoices for approval
Invoices not sent to KSeF, or not approved in KSeF, are visible in the Send invoices for approval list.
From this list, you can also send invoices to KSeF, using the  Send invoices to KSeF button in the function menu. All invoices in the list that have a ticked checkbox will be sent to KSeF.
In the Selection tab, you can choose if all invoices in the list should be included as default, by activating/deactivating the Pre-select "Include" setting.
Check status for sent invoices
Invoices sent to KSeF, approved in KSeF (received confirmation with KSeF invoice number and date), and invoices sent but not approved in KSeF, are visible in the Check status for sent invoices list.
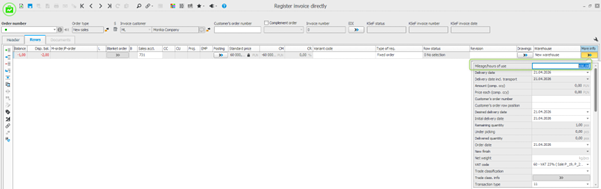
The KSeF status and the KSeF invoice number and date are visible for each invoice in the invoice header in the Register invoice directly procedure.
The status of the invoice approval in KSeF is also visible in the Update accounts receivable procedure header. The status is updated automatically when the status changes.

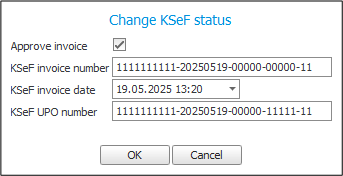
It is possible to manually change the status of the invoice to Approved using the  Change KSeF status button. Tick the Approve invoice checkbox and enter the KSeF invoice number and date. If you would like, you can also provide the number received from the KSeF confirmation in the field KSeF UPO number.
Once the changes have been approved, the KSeF invoice number, date, and confirmation number will be visible under the Miscellaneous heading in the procedure.
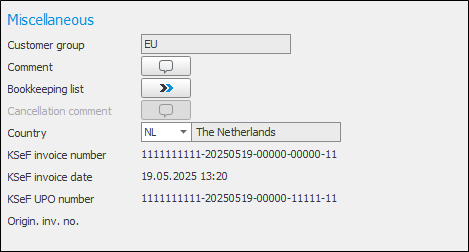
Under the Miscellaneous section in the Update accounts receivable procedure, you can also find the following information:
KSeF UPO URL
Please note that this is not a regular link. It is a SAS token, a temporary link generated in KSeF with an expiry date. The link is valid for a maximum of 72 hours.
KSeF invoice tag
The tag is automatically set for each invoice that is approved in Monitor. For invoices that are not approved in KSeF, you can change the tag manually. Once the KSeF status is changed to Approved, the field is cleared and can no longer be edited.
Example of automatic status setting:
- If KSeF is inactive or the customer is excluded from KSeF, the value BFK is set.
- If the invoice is sent to KSeF but no confirmation of approval has been received, the value OFF is set.
Printing a KSeF invoice
An invoice sent to KSeF for approval (status: KSeF Sent for approval) is not available for printing. Once the invoice is approved in KSeF, it is automatically marked as printed.
An invoice approved in KSeF can be reprinted using the Print invoice procedure. The printout of a KSeF approved invoice includes a QR code containing a verification link to the invoice in KSeF.
Offline mode
If you have added an Offline Certificate in the KSeF export settings and updated the KSeF connection with it, you can print an invoice that has been sent to KSeF for approval but has not yet been approved, using offline mode.
In the Print invoice procedure, select the invoice you want to print, select the Print invoice in offline mode checkbox, and load the invoice into the list. The invoice will then be available for printing.
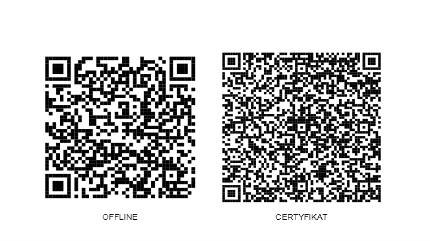
The printout will be marked with two QR codes:
-
OFFLINE: containing a link to the invoice in KSeF
-
CERTIFICATE: containing a link to verify the invoice issuer in KSeF.
After the invoice is approved in KSeF, the printout containing two QR codes is automatically replaced with a printout that includes a single QR code with a link to the registered invoice in KSeF.
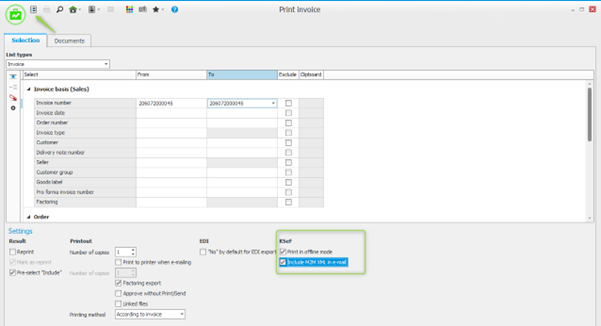
If you send an invoice to a customer by e‑mail, you can attach the Monitor XML (not the KSeF XML) by selecting the Include M2M XML in e‑mail checkbox.
Payment terms
Before you start working with KSeF, you must assign KSeF payment terms to the payment terms that will be used on invoices sent to KSeF in the procedure Terms.

Settings in the Customer register procedure
You also need to adjust some settings in the Customer register procedure:
-
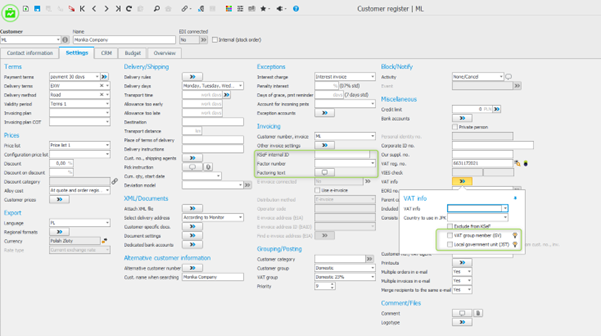
VAT group member: The VAT group member checkbox is available in the VAT info folded field. Use it to mark the customer who is the recipient of the order as a member of a VAT group.
-
Local government unit: The Local government unit checkbox is also available in the VAT info folded field. Use it to mark the customer who is the recipient of the order as a local government unit. In both cases, the customer must be added to the invoice in the Customer number, invoice field.
-
KSeF internal ID: In this field, you can enter the internal identifier assigned to the order recipient in KSeF. This identifier can be used for the order recipient, a VAT group member, a local government unit, or a factor.
-
Factor number: In this field, you can specify a previously defined customer whose details will be included as the factor on the invoice sent to KSeF.
-
Factoring text: For the customer defined as a factor, you can specify a factoring text in the customer record. This text will be used on invoices where the customer is indicated as the factor.
Part register
If the part you sell is a new means of transport, in the Part register procedure, you can specify whether it is a land, air, or floating means of transport.
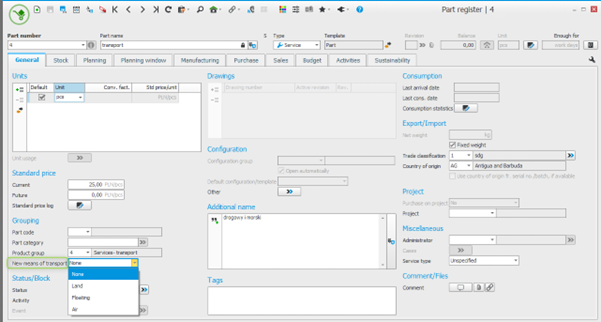
If the part is marked as a new means of transport on the customer invoice, you must provide either the mileage or the number of hours of use, depending on the type of means of transport.
Register supplier invoice
When registering a supplier invoice based on an invoice imported from KSeF, the invoice header data is automatically populated. This includes the invoice number, KSeF invoice number, invoice date, purchase date, due date, invoice amount, VAT amount, currency, exchange rate, order number, split payment information, and employee name (identified by name or by KSeF internal ID).
-
KSeF invoice tag: For invoices imported from KSeF, this field is inactive because the KSeF invoice number is populated automatically. For manually registered invoices, select the appropriate value in this field.
-
Employee No.: For invoices imported from KSeF, this field is automatically populated if the invoice includes an employee as an entity. For manually registered invoices, you can select an employee by searching by employee number, name, or KSeF internal ID.
Personnel records – General
KSeF internal ID: Use this field to enter the internal identifier assigned to the employee in KSeF. This identifier can be used when registering supplier invoices related to employee‑related costs.
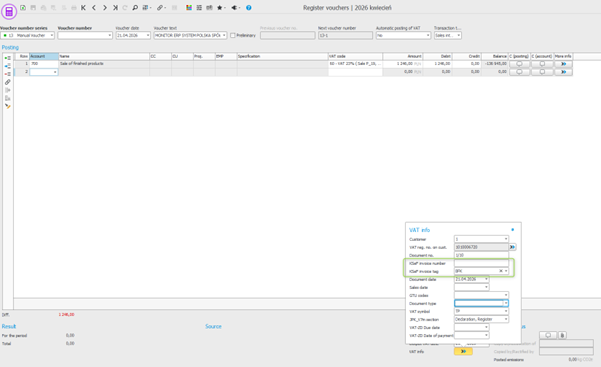
Register voucher
For manually registered vouchers of the Sales internal and Purchase internal type, you can enter the KSeF invoice number or the KSeF invoice tag in the fields available under the VAT info folded field.
Print VAT report
All documents included in the VAT report must contain either a KSeF invoice number or a KSeF invoice tag. If any vouchers are missing this information, the VAT report cannot be approved.
You can verify whether all documents contain the required KSeF information in the Detailed per invoice (VAT input) and Detailed per invoice (VAT output) lists, using the KSeF invoice number and KSeF invoice tag fields.


