Settings
The following settings must be configured before you can send and receive e-invoices in Monitor ERP.
Before you can begin using the e-invoice services in the system, the following settings must be configured:
- Open the Export tab under Settings for export/import.
- Select E-invoice under export type.
- Select E-invoice Peppol BIS 3.0.
-
Select E-invoice address and then E-invoice address ID (EAID). Check your company’s e-invoice address with your operator.
For countries other than Sweden and Finland, the company’s VAT registration number is usually used as the e-invoice address. The code for this is then entered in the EAID field.
- In Path to file, you can enter the path to the directory where the export files (XML) are to be saved after being uploaded to the operator. The path is entered in UNC format, for example: \\server\directory.
-
Enter a file name. The following variables can be used:
-
%i – invoice number
-
%x – today's date
-
%c – ID number of the company
-
%C – company name
If you leave the file name empty, the invoice number will be used as file name for the XML file.
-
-
Enclose embedded PDF in XML decides if an embedded PDF should be attached in the XML file with an e-invoice. The setting is deactivated by default and you manually have to activate it if you wish to attach the PDF file.
-
Check Use FTP to configure settings that enable invoice files to be sent and received via FTP. This means the invoices can be uploaded directly to your operator's FTP page.
Please note! Check with your e-invoice operator how the FTP settings should be configured.
- Under FTP server, enter the address of your operator’s FTP server, for example, "ftp.company.se". You do not have to use "ftp://" at the beginning of the address.
- Under Port, enter the port for FTP communication. The standard port is 21 (control channel for unencrypted FTP). This is selected by default. If you select Implicit (FTPS) as encryption method below, the port should be changed to 990 (control channel for implicit FTPS).
- Under Encryption method, select whether the FTP connection should be SSL encrypted as Implicit (FTPS) or Explicit (FTPS). The default alternative is None (FTP), that is, unencrypted FTP. Implicit encryption is normally initiated over port 990. Explicit encryption is initiated over the standard port 21.
- Under User name, enter the user name for the FTP account.
- Under Password, enter the password for the FTP account.
- Under Path, enter the path to the directory on the FTP server to which the files will be exported. The path must begin with a slash: "/".
- By clicking Test connection, you can verify that the connection to the FTP server works.
- Save.
To receive e-invoices, the following settings must be configured. Under Settings for export/import, the following settings must be configured before you can receive invoices.
- Go to the Import tab in the Settings for export/import procedure. Select Supplier invoice under import type.
- Select E-invoice Peppol BIS 3.0.
- Select Download invoices.
- Under FTP server, enter the address of your operator’s FTP server, for example, "ftp.company.se". You do not have to use "ftp://" at the beginning of the address. Check with your e-invoice operator how the FTP settings should be configured.
- Under Port, enter the port for FTP communication. The standard port is 21 (control channel for unencrypted FTP). This is selected by default. If you select Implicit (FTPS) as encryption method below, the port should be changed to 990 (control channel for implicit FTPS).
- Under Encryption method, select whether the FTP connection should be SSL encrypted as Implicit (FTPS) or Explicit (FTPS). The default alternative is None (FTP), that is, unencrypted FTP. Implicit encryption is normally initiated over port 990. Explicit encryption is initiated over the standard port 21.
- Under User name, enter the user name for the FTP account.
- Under Password, enter the password for the FTP account.
- Under Path, enter the path to the directory on the FTP server from which files will be imported. The path must begin with a slash: "/".
- Under File in source path, specify whether the import file is to be deleted or retained after an import is carried out by the operator.
- By clicking Test connection, you can verify that the connection to the FTP server works.
- Under Target path, enter the path to where your import files will be saved. The path is entered in UNC format, for example: \\server\directory. This path must also be entered as the path to XML inbox in the Scan supplier invoices procedure. See more under XML inboxes, below.
- The time and date of the most recent loading are shown under Most recent loading.
- A log of the most recent download is shown under Most recent status. If everything is working, an OK is displayed. If something goes wrong, an error message appears.
- Select Scheduling active if you want automatic download of e-invoices to be active. Downloads are scheduled to take place every hour.
- You can select the recipients of error messages, as required, under Notify when error occurs. The error messages are shown as notifications in the system.
- Save.
Settings for XML inboxes are configured in the Scan supplier invoices procedure.
- Open the Paths for inboxes tab in the Scan supplier invoices procedure.
- Enter the path for the inbox you entered under the Import tab in Settings for export/import.
-
Enter a filing folder too.
Please note that the filing folder must have a separate path, and may not be located in a sub-folder of the regular XML path (the Target path).
- Save.
You will need to check a number of other settings before e-invoice can be used. As communication takes place in Peppol format, certain data must be linked with ISO codes.
- Open the Basic data
 With "basic data" we refer to the static records in a database, for example parts, customers, users, work centers, etc. – Part procedure and enter the ISO code for the units under the Units tab.
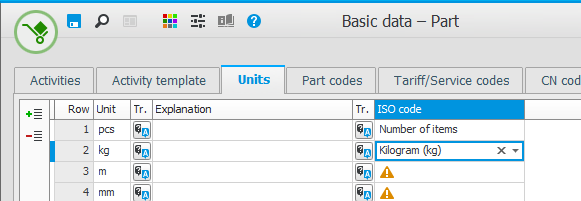
- Save.
Make sure the ISO codes are linked to the VAT codes under the VAT codes tab in the VAT settings procedure. This should take place automatically when the system is installed.


