FAQ – Customer and supplier invoices
Customer invoices
- Select the Invoice customer you want on the header row.
- Select the Invoice type called Correction invoice in the Invoicing box. Correction invoices are used to rectify incorrect information on an invoice, for example regarding quantity, price, or VAT. The invoice type is also used if the customer returns parts or if you give the customer a discount. A separate number series is used for this invoice type.
- Choose a Cause code. If you want to use fixed cause codes for Correction invoices, you must register these in the Cause codes procedure. It is also possible to enter a text as a cause code.
-
In the field Correction of invoice you can select or enter which invoice number to correct. When you enter an invoice number in the field Correction of invoice number, a separate window will open. In this window you make the corrections needed and click OK. The procedure name Register invoice directly is shown in red to indicate that a Correction invoice is being handled. Under the Rows tab you see the original row and the correction row. On the invoice, the text "Correction invoice" will be shown. It also shows which invoice number it is correcting and all information and amount to which the correction refers.
It is convenient to use the same invoice number on the Correction invoice as on the debit invoice and just add the prefix "C". This facilitates when searching in e.g. the invoice log and the accounts receivable.
You can delete/cancel an invoice basis as long as it has not been approved (been given status 8). If a pro forma has been created for the invoice basis you must start by deleting the pro forma using the button Delete pro forma invoice  in the Miscellaneous box, before you can delete/cancel the invoice basis.
- Select an order number and load the invoice basis.
- Click Delete (Ctrl + F6) in toolbar of the procedure.
-
When you click the button you get two options regarding deletion:
- Cancel invoice basis without affect on balance – If it is a delivery reported customer order row which is the basis to the invoice basis, then the delivery will not be undone. This option is not available if the invoice basis comes from an invoicing plan on a customer order.
- Cancel and undo the delivery reporting – The delivery reporting is also undone.
If an invoice basis has been approved (when an invoice is created), but the invoice is unpaid, you cancel the invoice in the procedure Update accounts receivable. If an invoice already has a registered incoming payment, it is not possible to delete/cancel until the payment has been deleted. This is done in the Incoming payments procedure.
Deleted invoice bases are not shown in the system, but can be included in the list in the procedure Invoice basis – Sales by including status 0 in the selection.
If you in the system setting called Check open accounting period during order reporting have selected the Block alternative, the delivery will not be possible to undo when deleting/canceling the invoice basis in cases where the date belongs to a closed accounting period.
There are a few settings you need to configure to get up and running:
System settings
There are a number of different system settings regarding interest invoicing which you need to review. You find these settings under the heading Interest invoice, under the Sales tab in the System settings procedure. Some of the settings have a default value. Please read the description of these system settings in the online help function for that procedure.
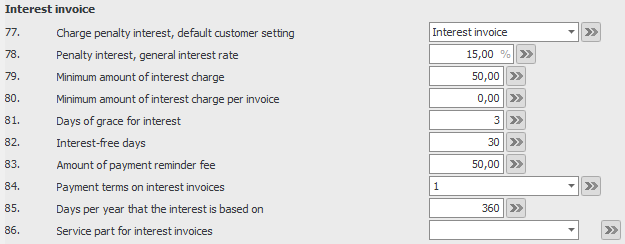
- Create a product group for interest (call it, e.g., "Interest") and select the sales account for penalty interest 8313 (in Sweden) for all customer groups. This is done under the Product group and Sales account tab in the Posting matrix procedure.
- Select VAT code 4 (VAT exempt) for the product group for all customer groups. This is done under the Exception per product group tab in the VAT settings procedure.
- Create a part of the Service type (call it, e.g., "Interest") and choose Unspecified as Service type. Assign the part the product group you created earlier. This is done in the Part register procedure.
- Finally, select this service part in the above mentioned system setting.
Customer register
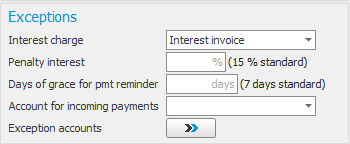
For some of the above mentioned system settings it is possible to make exceptions per customer. You find these in the Exceptions box, under the Settings tab in the Customer register procedure. If a setting here is empty (no alternative has been selected), it means the system setting applies. But if you enter/select a setting, this will override the corresponding system setting when interest invoicing to that customer in question.
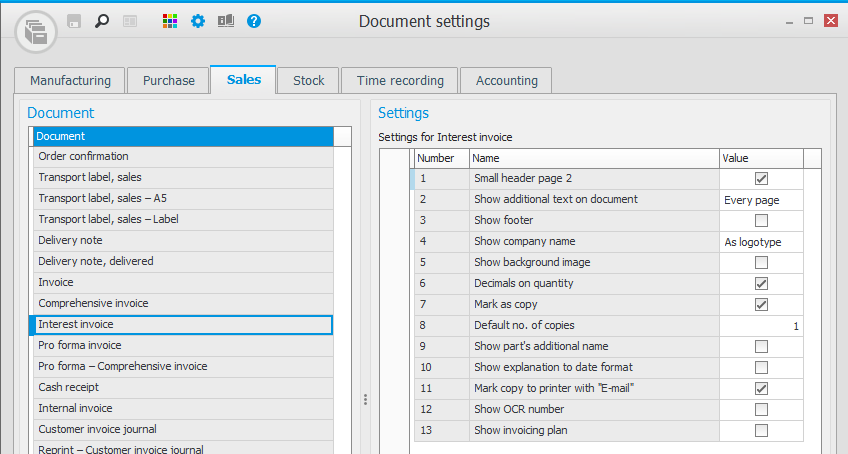
Document settings
For interest invoices there is a document template called Interest invoice in the Document settings procedure. You need to review the settings of this document template. Read more about these settings in the Settings topic.
You can read more about Interest invoicing here.
You use cash receipt when making sales where you receive cash payment (in actual cash or via card payment) in connection to when you approve and print the invoice, for example when selling in a store. Cash receipt can also be selected when you register customer orders.
The cash receipt will be paid automatically in the accounts receivable when approved. Posting of the cash receipt is recorded in the customer invoice journal. No incoming payment journal will be printed for this invoice type (even though it automatically becomes set as paid).
On invoices of the type cash receipt, no payment terms are shown.
Cash receipt has a separate document template and can also have a separate number series (optional).
Internal invoices are for internal use to handle sales of internal customer orders, for example when withdrawing goods for a trade fair, etc. Then you wish to register the withdrawal from stock and to get a delivery note for the withdrawal, but the invoice should only be recorded as internal sales and not to be sent to customer. Here you often use an internal customer number on the order (referring to the own company or sometimes departments in the company). You might also use it when dealing with internal invoicing between group companies.
Posting of the internal invoice is recorded in the customer invoice journal.
Internal invoice has a separate document template and can also have a separate invoice number series (optional).
Supplier invoices
In order to credit an order invoice, you do the following if the crediting concerns credit of the quantity on the row:
- Load the debit invoice by entering the consecutive number of the debit invoice on the header row.
- Create a credit invoice by selecting Credit as Invoice type. If the option EIM is activated in the system, then there is a button next to the field Consecutive number. You can use this to display the debit invoice to be credited.
- Enter the consecutive number of the debit invoice in the Consecutive number field under the Invoice type field.
- A new window for crediting invoice is opened. There you will see the contents (order rows) from the debit invoice and you can mark the order rows that you want to credit. If a comprehensive invoice is concerned, these rows will be shown. An order row can also be partially credited by entering a quantity and choose if the crediting affects the balance.
- Mark Create new invoice basis if the supplier will send a new invoice for the credited quantity.
- Click OK to create a credit invoice. The order number on the credit invoice will be the same as the debit invoice, but with a sub-number.
- Send the invoice for authorization or final record it.
- Save.
To credit an order invoice, you do as follows if the crediting concerns credit of the price on the row:
- Load the debit invoice by entering the consecutive number of the debit invoice on the header row.
- Create a credit invoice by selecting Credit as Invoice type. If the EIM option is activated in the system, there is a button next to the Consecutive number field. You can use this to display the debit invoice to be credited.
- A new window for crediting invoice is opened. There you will see the contents (order rows) from the debit invoice and you can mark the order rows that you want to credit. If a comprehensive invoice is concerned, these rows will be shown. Mark Price credit and enter Credited price or New price. Monitor ERP calculates the price which you have not entered.
- Click OK to create a credit invoice. The order number on the credit invoice will be the same as the debit invoice, but with a sub-number. Now a row is created with original price to remove the debit invoice, and a row with the new price.
- Send the invoice for authorization or final record it.
- Save.
To credit an expense invoices, you do the following:
- Load the debit invoice by entering the consecutive number of the debit invoice on the header row.
- Choose if the entire debit invoice should be credited or not. If you choose not to credit the entire invoice, you must manually enter the invoice amount and posting to be credited.
- Enter the consecutive number of the supplier invoice you want to delete and then click the Cancel button
 on the toolbar.
 - In the window that appears called Comment for cancellation you must enter why the invoice is being canceled.
- Then click OK in the Comment for cancellation window.
- The status of the supplier invoice is then set to Canceled.
If the canceled invoice was only registered, no offset entry will be created. If it has a preliminary entry, a preliminary offset entry will be created. If it is final recorded, a final offset entry will be created.
If the canceled invoice has a preliminary entry and the preliminary entry date is outside the open accounting period, you will see a window where you can enter the date for when the cancellation should be recorded. The date that will be suggested is the first date in the first open period. If the canceled invoice is final recorded and the date is outside the open accounting period, you will see a corresponding window. When you cancel the invoice, the entries created for the invoice will be removed from the supplier invoice log.
If the canceled invoice has preliminary linked or linked order rows, the invoice bases will be released from the invoice and again made available for linking to a new invoice.
Please note! It is not possible to cancel a supplier invoice which has a registered payment. In that case, you first have to cancel the payment in the Outgoing payments procedure.
Applicable to those of you that have the EIM option.
If you have closed the invoice viewing window in any of the Register/Authorize supplier invoice procedures, you can click the Show invoice image button  to open the window again.
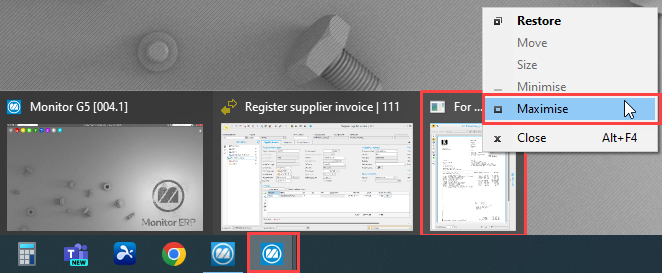
If you have only minimized the invoice viewing window, you can open it by hovering your mouse over the Monitor icon in the task bar and click the invoice image window.
Sometimes if you have switched screens, or e.g., from two screens to a laptop, the computer may be displaying the invoice viewing window on a screen which is no longer connected. If this is the case, you can hover your mouse over the Monitor icon in the task bar, right-click, and select Maximize on the invoice image window.