Move and hide columns
You can change the standard layout in lists and tables. This is done by moving around the columns, hiding or inserting columns.
To move a column you drag the column heading sideways using you mouse pointer and then you drop it where you want to place it, between two other columns. You are helped by two arrows showing when you can drop the column heading. See the image example.

To hide a column you drag the column heading from its place using the mouse and drop it above
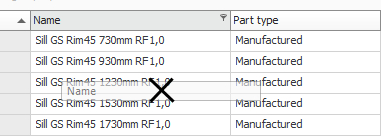
The column you hid can now instead be found under the More info button  at the far right in the the list or table. The button functions as a collector of columns you do not wish to show by default. If this button is not shown in the list or the table you are working in, it will appear when you hide a column.
It is useful to be able to hide columns if you for example want to print a very wide list where there is not enough room on the printout for all columns or if you only want to see certain columns.
In certain tables the More info button is available in the standard layout. It then holds the columns not displayed by default. You can insert a column by dragging it from the button and dropping it where you would like it in the table.
Please note! A column is only temporarily hidden when you drag and drop as described above. If you want to retrieve a column (which you have hidden) to the list, you only have to reload the list to make it appear again. or restart the procedure.
If you have modified the standard layout in a list or a table and want to save this permanently, this is done using the Layout button  on the toolbar in the procedure. In a list this also includes groupings made in the list (you group a list by dragging the column heading to the list's grouping header). Read more about Group lists.


