Format templates (in import procedures)
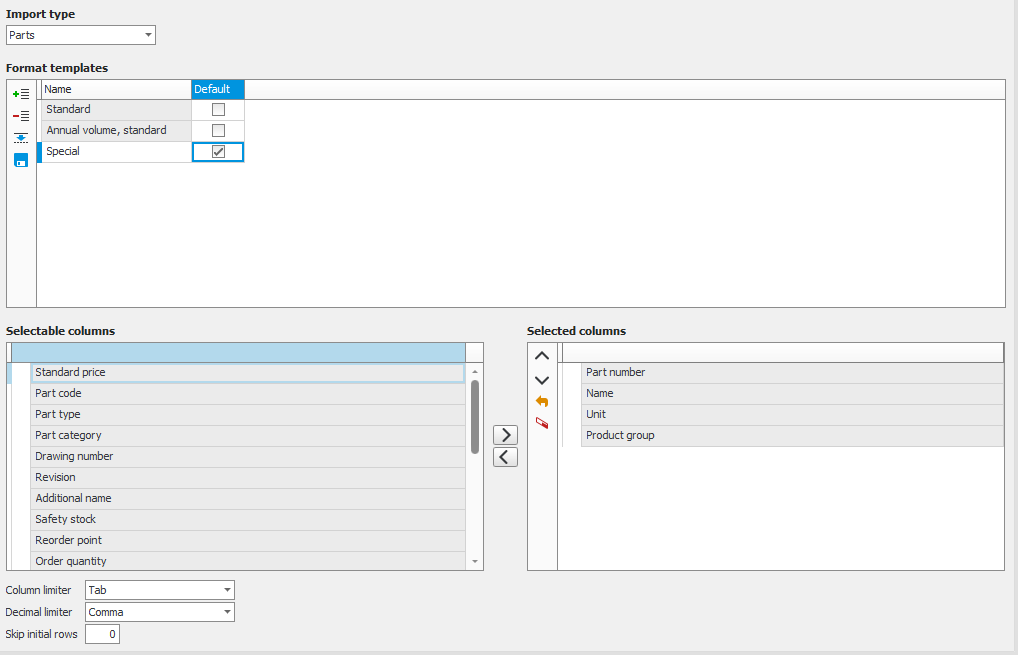
Under Format templates in the backstage of the procedure you can create your own format templates for import of data from text files which have been exported from another ERP system. In your own format template you can define which columns to use and also decimal limiter.
The import template with custom/own format templates for different data is available in the following procedures: Supplier import, Customer import, Part import, Price import, Chart of accounts import, Voucher import, Budget import, and Fixed assets import.

There is also an import function with fixed format templates for stock balances in the Balance import procedure.
Tip!
- An Excel file in CSV format, which is comma-separated and has a period as decimal limiter, can also be used as source.
- If data should be taken, for example, from within Monitor ERP (e.g. Material list or Operation list): Export the list via Clipboard to Windows. Paste in Excel. Save the Excel file as Text file (.txt), Tab-separated. Then this file can directly be used as a source of import.
In the Part import procedure you start by selecting an Import type for which you wish to create a format template. The available types of import are Parts, BOM lists, and Operations. The term Import type does not exist in the Supplier import and Customer import procedures.
In the Format templates table you by default see the Standard template which is included in the system. Here you can add an own format template, either using the button Add new row at the end  or via the Split row button
  and select which format template to be Default during import.
Here you can also choose to Save  the format template you have created.
Here you find a table with Selectable columns and a table with Selected columns. Using the buttons between the tables you can add  or delete
  columns in the format template. You can also change the order of the columns: up
  or down
  in the format template. This means you move columns to the right or to the left corresponding to the order in the text file. You can also add, delete, or move columns by dragging and dropping the columns with your mouse pointer.
When needed, you can Clear  your selected columns. Then all columns you have selected to add will be removed. Using the button Reset to most recently saved
  you can undo a change you have made after the format template was saved.
Some columns also have sub-columns. This is indicated by a small arrow to the left which is used to expand the main column and show the sub-columns. You can choose to add the entire main column including all sub-columns or select one sub-column at a time to add to the main column in the format template. You can also change the order of columns up and down in the format template. The main column only works as a grouping column in the format template. The sub-columns are the ones that might exist in the text file.
Please note! The order of the columns in the table called Selected columns must correspond to the columns of the text file. This means that the column on the first row will import data from the first column in the text file etc. You should use the column called Skip if there are one or multiple columns in the text file which you do not want the import to include. For example, if the fifth column in the text file should not be imported, then you add the Skip column on row five in the table.
Under the column table you configure the Column limiter of the text file: if it should be a Comma, Semicolon, or Tab.
You also select Decimal limiter for values in the text file: if Comma or Stop/period should be used.
You can also decide if the import should Skip initial rows in the text file. For example, if the forts row in the text file is a row of headings, then you enter one (1) in this setting. By default it says zero (0), that is, no row will be skipped.


