Settings
The following settings must be configured before you can send and receive e-invoices in Monitor ERP.
Before you can use the e-invoice services in the system, you are required to register an account at Maventa. You can register the account via Monitor ERP.
- Open the Export tab under Settings for export/import.
- Select E-invoice under export type.
- Check E-invoice Maventa.
- If your company already has an account with Maventa, you can enter the API key, Company UUID, and E-invoice address (EIA) manually. You can find these details when you log in to your Maventa account. Click Test connection when you have entered the data.
- Make sure Send e-invoice to Maventa is checked if you want to send invoices to the customer via Maventa’s server. This setting is checked by default. Deactivate the setting if you want to create e-invoices (XML and PDF) without sending them to the customer.
-
Enclose embedded PDF in XML decides if an embedded PDF should be attached in the XML file with an e-invoice. The setting is deactivated by default and you manually have to activate it if you wish to attach the PDF file.
- In Path to file, you can enter the path to the directory where the export files (XML and PDF) will be saved after being uploaded to Maventa’s server.
-
If your company does not have an account with Maventa, you can click Create account instead.
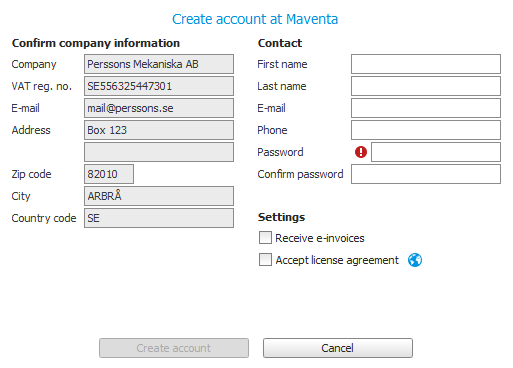
You must confirm your company information here. The contact information First name, Last name, and E-main is loaded from the logged-in user, but it can be changed. Phone is not mandatory.
You must enter a Password for the account and confirm the password. The password must consist of at least eight characters. It must contain upper-case letters, lower-case letters, digits, and special characters.
You must activate the Receive e-invoices setting in order to receive e-invoices.
You must mark the Accept license agreement box to activate the service. You can also read the license agreement by clicking the
 button.
 - Click Create account. When you create the account, Monitor ERP has contact with Maventa via an API in order to complete the registration. If everything works correctly, you will automatically receive your company's API keys and EID.
- Click Test connection in order to verify that the E-invoice keys for Maventa are correct.
- Click Activate banking network in order to register the company with the Finnish banking network, so that invoices can be processed via the banking operators. Please note that the Maventa account must be fully registered before this activation can take place. Activation in the banking network can take between two and five days.
- Click Account settings to be linked to the Maventa Dashboard where you can adjust settings for e-invoices. You can also complement the settings as well as view information about sent/received invoices.
- Registration is now completed. Remember to save.
Under Settings for export/import, the following settings must be configured before you can send invoices.
Send e-invoice to Maventa?
To be checked if you want to send invoices to customers via Maventa’s server. Deactivate the setting if you want to create e-invoice files (XML) without sending them to the customer.
Path to file
Enter the file path to the folder in which the XML files are filed after being uploaded to Maventa’s server.
Click Account settings in order to access your account page with Maventa. Additional settings can be found here, and you can see the details of invoices you have sent/received.
To receive e-invoices, the following settings must be configured. Configure your Maventa account to enable invoices to be received.
Under Settings for export/import, the following settings must be configured before you can receive invoices.
- Go to the Import tab in the Settings for export/import procedure.
- Select Supplier invoice under import type.
- Check E-invoice Maventa.
- Enter a Path to a directory where e-invoices (XML and PDF) are to be downloaded from the Maventa server. The same path must also be entered in Paths for inboxes under the Scan supplier invoices procedure.
- Check Scheduling active if you would like supplier invoices to be downloaded automatically. The automatic download takes place every hour. You can also start a manual download of supplier invoices in the Register supplier invoice procedure.
- The time and date of the most recent loading are shown under Most recent loading.
- A log of the most recent download is shown under Most recent status. If everything is working, an OK is displayed. If something goes wrong, an error message appears.
- You can select the recipients of error messages, as required, under Notify where error occurs. The error messages are shown as notifications in the system.
Settings for XML inboxes are configured in the Scan supplier invoices procedure.
- Open the Paths for inboxes tab in the Scan supplier invoices procedure.
- Enter the path for the XML inbox you entered under the Import tab in Settings for export/import.
-
Enter a filing folder too.
Please note that the filing folder must have a separate path, and it may not be located in a sub-folder of the regular XML path. - Save.
You will need to check a number of other settings before e-invoice Maventa can be used. As communication takes place in Peppol format, certain data must be linked with ISO codes.
- Open the Basic data
 With "basic data" we refer to the static records in a database, for example parts, customers, users, work centers, etc. – Part procedure and enter the ISO code for the units under the Units tab.
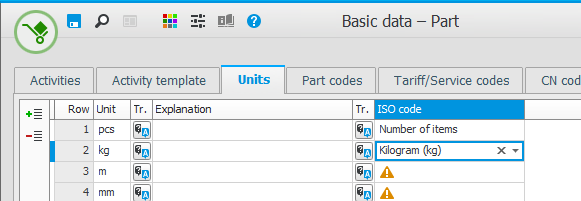
- Save.
Make sure the ISO codes are linked to the VAT codes under the VAT codes tab in the VAT settings procedure. This should take place automatically when the system is installed.


