Configuration groups
In this procedure you create and update your configuration groups. A configuration group describes the combination of a product.
On the header row you can enter a comment and link files to the configuration group. The comment is shown in the guide during order registration and can then be of help. On the main row you also see which parts are linked to an existing configuration group-
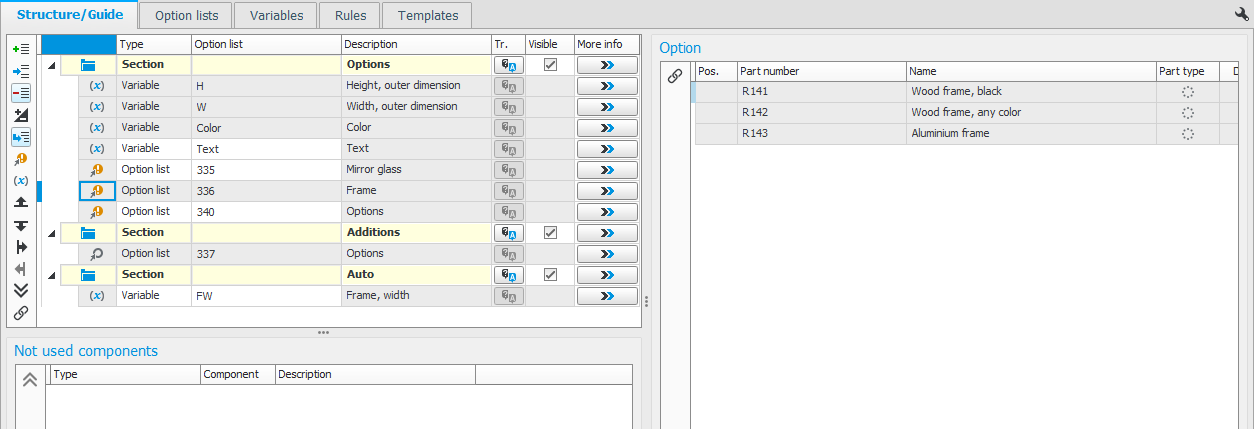
Under the Structure/Guide tab you create and edit the guide you will use when registering an order for the product.
Here you place section, option lists, and variables in a structure so they appear in a logical order. A section has a name with translations and settings for how it should be shown in the guide and on documents. A section forms one page in the guide used when registering an order. On order documents the section functions as a grouping with a heading and a footer.
It is possible both to add existing option lists and variables, and to create new ones directly in the section in question. Using the buttons on the function menu or by using the "drag and drop" function, you can move and organize option lists and variables among themselves and also between different sections. You can also move an option list into another option list, making it an underlying level to an option list in the structure.
To edit more properties and the different options in new option, you can use the link to the procedure Option lists which you find on the function menu. There is also a link to the procedure Variables where you can edit properties for those.
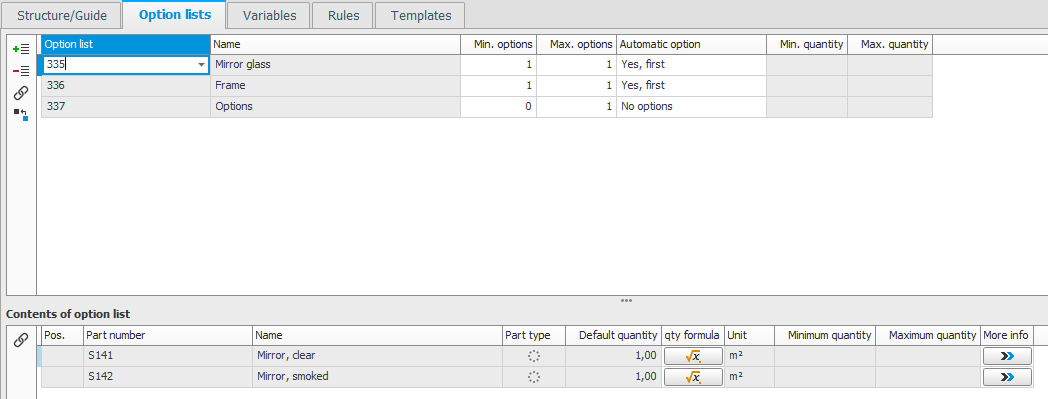
Under the Option lists tab you get an overview of the option lists used in the configuration group. Here you can add and delete option lists. It is also possible to create new option lists by entering a new option list code. In that case you need to add the new option list in the structure under the Structure/Guide tab before you can save in the procedure.
You decide how an option list should function with the Minimum number of options (Min. options) and Maximum number of options (Max. Options) settings, as well as if it should be an Automatic option or not. If the Max. options value is greater than Min options, you can also enter a Minimum quantity and a Maximum quantity.
In the lower section of the tab you see which options an option list contains, but it is not possible to change that content here.
If you add or create new option lists under this tab, you must then "Add option list" under sections under the Structure/Guide tab before you can save in the procedure.
Under the Variables tab you see all variables included in the configuration group. It is possible to add and delete variables. Certain variable settings can also be updated here.
If you add variables under this tab you must then use them under sections under the Structure/Guide tab before you can save in the procedure.
There are three ways for variables to be given values:
- The user enters values when registering the order.
- Values are calculated using a formula.
- Values are added via choices made in the determining option lists (see below).
If a variable should be determined by one or multiple option lists, meaning it should get its value via selected parts in determining option lists, then you can here enter default values in the field Value directly for the option (the parts) in the determining option lists. This is done in the bottom section of the tab.
As an alternative you can configure that values should be loaded from certain fields on the parts in the Part register, via the setting Link to field on the variable. When the variable is determined by option list you also get to select an Aggregation![]() Aggregation is data that is totaled or combined, creating new data. method. This means how values from multiple options or part fields should be used as the variable's value.
Aggregation is data that is totaled or combined, creating new data. method. This means how values from multiple options or part fields should be used as the variable's value.
A useful tip might be to use Extra fields for parts in the part register if values should be loaded from the parts in the part register.
Under the Rules tab you create and update the rules which should apply in the configuration group.
Each rule is given a rule number and you can enter a description to help understand the rule later on. When needed, it is possible to renumber the rule numbers. You can sort and filter by all columns in this tab. This makes it possible for you to analyze all rules affecting a certain option or to find all rules where an option or a variable is having an impact.
In the columns Logical formulation, Excluded by rule, and Selected automatically by rule, the option list code, part number, and variable code, are shown to describe the rules. You can decide if the two final columns should be shown. This is done with the setting Show columns for "Excluded by" and "Automatically selected by" at the top of the tab.
With the Rule definition button  you open a window where you can edit the rules (see below).
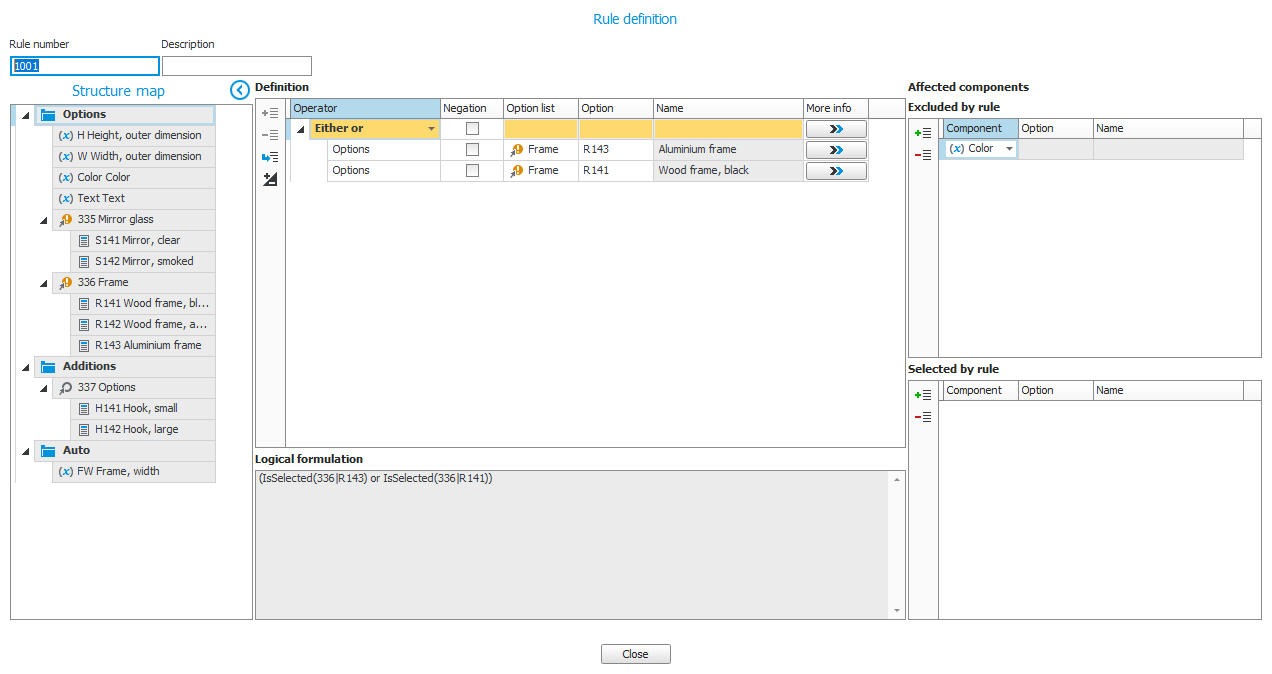
Rule definition
A rule can exclude one or multiple options in an option list but also an entire option list or a variable. A rule can also configure that one or multiple options should be made automatically. Rules can contains complex terms which you create of options and variable values and logical and mathematical functions. For example, you can create rules which automatically will add or exclude certain equipment based on different "packages" for the product.
Tips for rules:
- Use an option list with the setting Automatic option – Yes, first. Add the options (the parts) in a logical order in the option list and create rules which excludes invalid options. Then the first valid option will automatically become selected but the user can manually choose other options during the configuration. This is often used when some kind of dimensioning is concerned where the first option which is "sufficient" or "good enough" will automatically be selected, but you can manually select a different option (for example a more powerful drive motor).
- Use the function Negation in the rule definition. If you need to add many rows in a definition it might be useful to consider "reversing the logic" using Negation to create a more simple rule.
- Divide large option lists in several smaller lists and create rules which excludes the entire option list instead of having to exclude each option separately.
- In the window called Rule definition you can use the drag and drop function. This means you use your mouse pointer to drag components from the structure map to the boxes for definition, excluded by rule, and selected by rule.
- If you need to create many rules that are similar, you can start by creating one rule as template. Then you copy that rule to new rules by using the button on the function menu under the Rules tab.


