Bank integration
In the following section we explain how Bank integration option works in Monitor ERP and what settings you need to configure before the company can start using Bank integration.
Interested in the Bank integration option? A feature overview for Bank integration can be found here.
Frequently asked questions about Bank integration can be found here in our FAQ.
Watch the video about Bank integration (Only available in English):
| English |
|---|
The following banks are currently supported:
Sweden:
- Danske Bank
- Handelsbanken
- Nordea
- SEB
- Swedbank
Norway:
- DNB
- Nordea
- Sparebank1
- Handelsbanken
- Eika
Finland:
- Nordea
What to keep in mind before using Bank integration for the first time:
-
Plan your switchover and decide when you want to start using Bank integration. We recommend having version 25.3 or later of Monitor ERP
-
Before using Bank integration for the first time, try not to send outgoing payments (ISO files) with payment dates more than a few days ahead. This makes it easier to report payments sent prior to using Bank integration (reporting of payments made via ISO files) as these lack the reference information necessary to be matched automatically.
-
Contact us at Monitor via this form if you wish to be helped setting up and get training (recommended).
-
Onboard with your bank as per the information below. Contact your bank if you have any questions.
-
If you need to sign consent or payments via Monitor Mobile, you need to make sure that Monitor Mobile has been installed in your environment. You can read more here.
Preparations
Onboarding
Onboard with your bank. The onboarding process differs from bank to bank. Below you can find more information regarding each bank. You can also access information about onboarding with most banks via the Onboarding at bank button in the Bank integration tab in the Bank settings procedure.
Sweden:
- Danske Bank (Contact your bank for information about the onboarding process. You can read more here.)
- Handelsbanken (read more here). You can also use the Onboarding at bank button under the Bank integration tab to start onboarding with the bank straight away.
- Nordea (read more here). You can also use the Onboarding at bank button under the Bank integration tab to start onboarding with the bank straight away. This applies to both Business and Corporate Netbank.
- SEB (read more here). You can also use the Onboarding at bank button under the Bank integration tab to start onboarding with the bank straight away.
- Swedbank (Contact your bank for information about the onboarding process. You can read more here.)
Norway:
- DNB (read more here). You can also use the Onboarding at bank button under the Bank integration tab to start onboarding with the bank straight away.
- Nordea (read more here). You can also use the Onboarding at bank button under the Bank integration tab to start onboarding with the bank straight away. This applies ot both Business and Corporate Network.
- Sparebank1 (read more here). You can also use the Onboarding at bank button under the Bank integration tab to start onboarding with the bank straight away.
- Handelsbanken (read more here). You can also use the Onboarding at bank button under the Bank integration tab to start onboarding with the bank straight away.
- Eika (Read more here). You can also use the Onboarding at bank button under the Bank integration tab to start onboarding with the bank straight away.
Finland:
- Nordea (read more here). You can also use the Onboarding at bank button under the Bank integration tab to start onboarding with the bank straight away. This applies to both Business and Corporate Netbank.
Company information
Make sure that the company’s VAT registration number is correct.
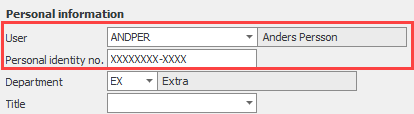
Personnel records – General
To grant access to the bank account from Monitor ERP, the user’s personal identification number
System settings
Since bank integration confirms and records incoming and outgoing payments simultaneously, it is necessary for the Register incoming and outgoing payments in the same procedure/journal system setting to be activated in the Accounting tab. It is important to note that you need to log out of Monitor ERP and log in again for the change to be registered.

Voucher number series/Journals
In Voucher number series/Journals you are able to link voucher number series to payment types for the integration Payments.
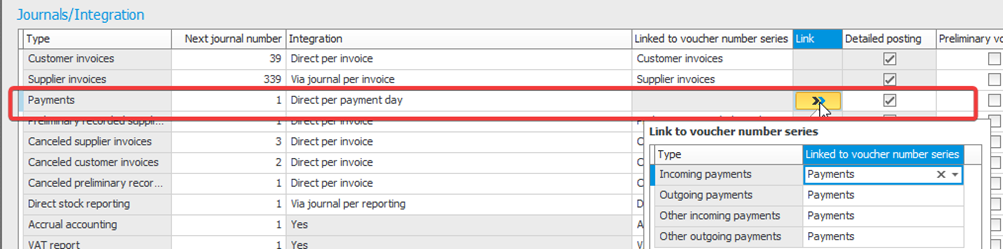
Mark the Detailed posting checkbox to facilitate bank reconciliation.
Activate Bank integration
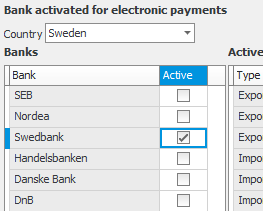
Bank settings – the Bank activation tab
Check that your bank is activated for electronic payments in the Bank activation tab.
Bank settings– the Bank integration tab
-
Ensure that you are logged in as an authorized user who can access the bank.
Nordea Corporate Netbank: Nordea only permits administrators in Corporate Netbank to use the banking features via Monitor. This means that the Bank Integration will not work if the finance staff responsible for payments and reconciliation do not have full authorization with the bank.
If you use DNB bank, you need to enter your customer number from the bank in the Customer ID field. If you use Nordea Corporate Netbank, you need to enter your login ID.
If you use SEB or Handelsbanken, in the group structure you need to enter your parent company’s organization number in the Parent comp.'s corp. ID no. field. This field becomes available when you activate the Parent company's corporate ID in bank integration system setting.
Group structure with Handelsbanken must be reported to Open Payments before activating bank integration. This is done by e-mailing apisupport@openpayments.io.
-
Activate bank integration via the Activate bank integration button.
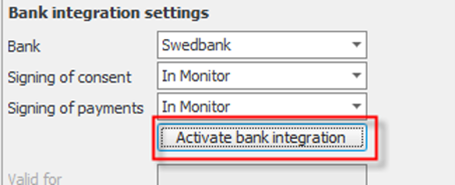 For most banks you are required to have also onboarded with them prior to activating the integration.
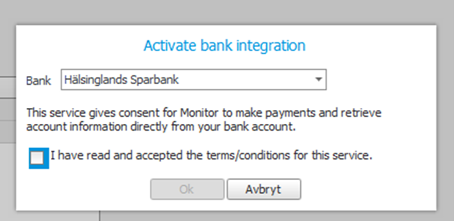
If you use Swedbank or Sparebank1, you will then need to select the relevant local bank.
If you use Nordea, you will need to select Business or Corporate Netbank.
Ensure that you have read and accepted the terms and conditions for bank integration.
-
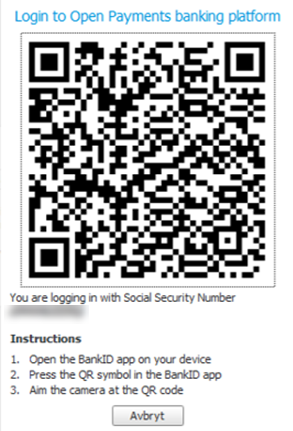
Sign with mobile BankID by scanning the QR code.
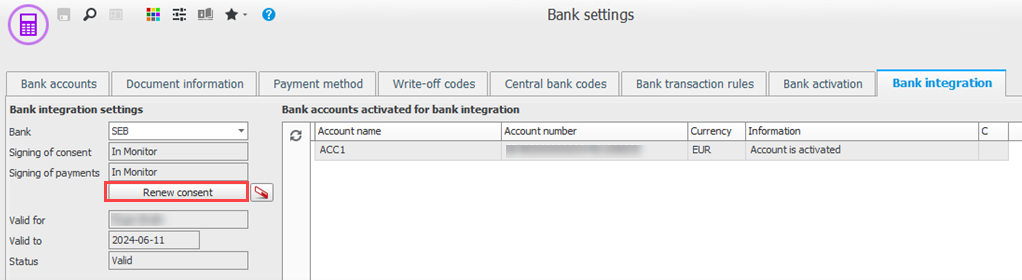
Bank integration is now activated for your user. Under Bank accounts activated for bank integration you can see which bank accounts a user has access to. If a bank account is missing in Monitor, you can create it by clicking the Create bank account button under the Bank integration tab.

By signing, electronic consent is given that Bank integration can use the bank account for 180 days. After this, consent must be given again. A notification is displayed in Monitor ERP in advance letting you letting you know when the consent runs out.
Please note that Bank integration needs to be activated for each individual user of the function. You can see which users have access to bank integration via the Bank integration button under the Bank accounts tab.
-
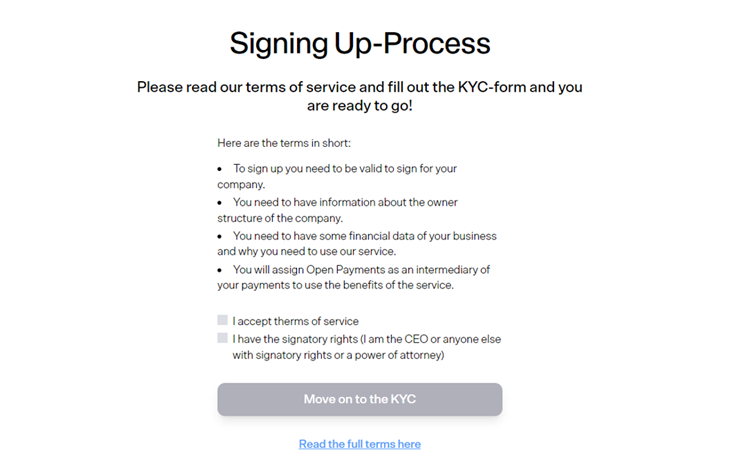
Click the KYC button to complete the mandatory know your customer verification where you are required to fill in details about your company. To comply with regulations surrounding payment services and for the prevention of money laundering, your company must complete the KYC verification for the payment services included in Bank integration. An authorized signatory of the organization or someone authorized to act on behalf of the company (such as a CEO or a head of finance) can fill out the KYC verification.
This button also activates the service Global Pay free of charge. This feature is used when making international payments. Global Pay involves connecting your bank account (in local currency) to a solution where currency payments are managed by an external party.
 Global Pay works regardless of whether you use Open Banking or File pay (ISO). Here you can read more about international payments via Global Pay.
If you want to make payments from your currency account, you may need to make payments via File pay (ISO). You can see what applies to your bank in feature overview.
-
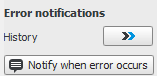
Choose who will be notified of an error via the Notify when error occurs button. The error messages are shown as notifications for the affected users in Message center.
Bank settings – the Payment methods tab
When bank integration is activated, payment methods must be created for the integration. Which settings are required depends on whether you use Open Banking or File pay (ISO).
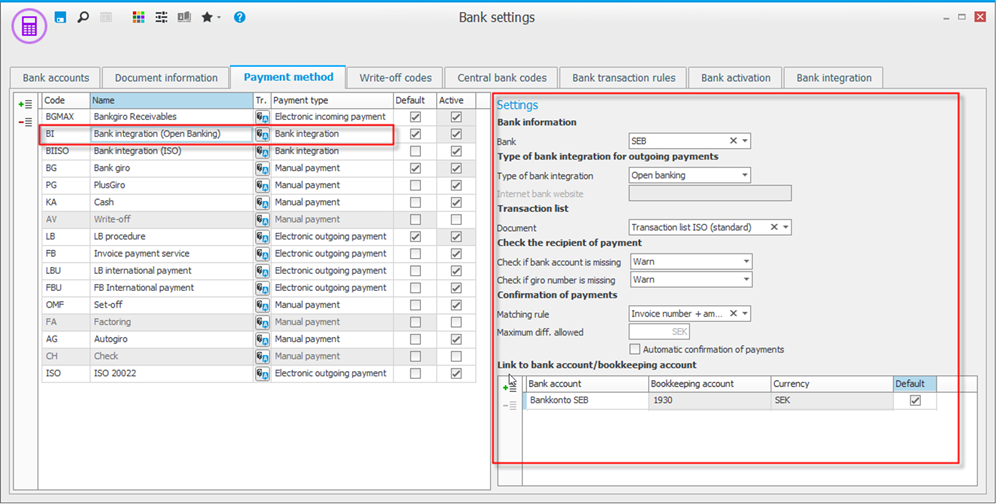
If outgoing payments only need to be made via Open Banking, you only need to create one payment method for bank integration:
-
You create a new payment method with the Add new row at the end button, and then e
 nter a code and name for the payment method.
 -
Under the Payment type column, select Bank integration and enter whether the payment method should be the default method or not.
-
Under Settings you select your bank, and Open Banking as Type of bank integration. Open Banking uses Global Pay for international payments.
-
Select Transaction list if you want to Check the recipient of payment and your settings for Confirmation of payment.
We recommend that you do not have the setting Automatic confirmation of payment activated the first time using Bank integration. This setting means that the system automatically matches and records payments. This occurs every night when bank statements are loaded from the bank.
-
Under Link to bank account/bookkeeping account, enter the bank account you wish to link to the payment method. Only bank accounts in the local currency can be linked to the payment method with the Open Banking integration. If making payment from a currency account, see the below File pay (ISO) settings.
Please note! Payments from currency accounts via Open Banking is supported Eika Gruppen (Norway), Handelsbanken (Norway) and Sparebank1 (Norway). So if you have this bank, currency accounts can also be linked.
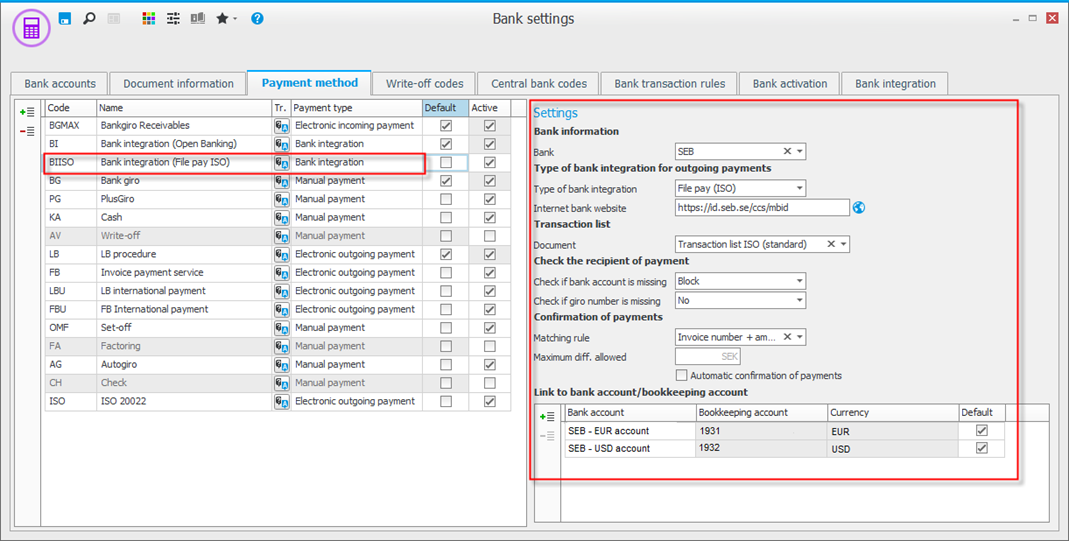
When using File pay (ISO), the following payment methods need to be added:
-
You create a new payment method with the Add new row at the end button
, and then enter a code and name for the payment method. -
Under the Payment type column, select Bank integration and enter whether the payment method should be the default method or not.
-
Under Settings you select your bank, and File pay (ISO) as Type of bank integration. The checkbox Use Global Pay by default for international payments is activated by default, but can be deactivated. You can also choose whether Global Pay should be used or not for each payment in payment suggestion.
Using Global Pay is beneficial as it costs less to make payments. Read more about Global Pay here.
-
As payments are signed through the bank, you can make things easier by adding a link to your bank’s website. The website will then automatically open when you create an outgoing payment.
-
Select Transaction list if you want to Check the recipient of payment and your settings for Confirmation of payment.
We recommend that you do not have the setting Automatic confirmation of payment activated the first time using Bank integration. This setting means that the system automatically matches and records payments. This occurs every night when bank statements are loaded from the bank.
-
Under Link to bank account/bookkeeping account, enter the bank accounts you wish to link to the payment method. When paying from a currency account a new row needs to be added for each currency. When using Global Pay for international payments, an account in your local currency needs to be added.
Supplier register/Supplier list
You need to update the your suppliers’ payment methods, as well as making sure that the correct mailing address has been entered.
If you have earlier used outgoing payments via file, you need to update your suppliers’ payment methods. The easiest way to do this is via the Supplier list where you can mass update your suppliers in list form, but you can also update the payment method in the Supplier register.
Make sure that you also adjust the system setting Default payment method for new supplier, so that new suppliers are by default registered with the payment method set for bank integration. You can find the setting under the Purchase tab in the System settings procedure.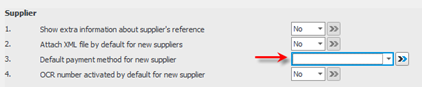
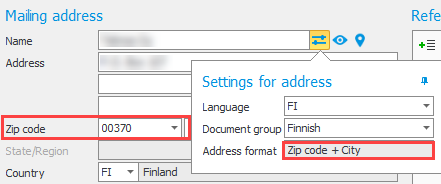
You also need check that you have the correct mailing addresses for your suppliers. This is especially important regarding international payments. The fields address (street), city and zip code must be entered for the supplier. If you have the General address format for a supplier, certain fields may not appear. The address format is determined by the country you have entered in the mailing address. If you are missing fields, you may need to update the address format in the Countries procedure. If you have updated the address format in the procedure, you may need to change the country of certain suppliers in the mailing address and then change back in order to allow the new format to load.
Outgoing payments
As before, outgoing payments are made via the Outgoing payments routine. Either directly via the Payment suggestion list type, or via the Pay via bank (order) tab. Use the payment method set for bank integration. Via the payment suggestion you can change the payment method of supplier invoices that are already registered. You are also able to update the payment method of all unpaid supplier invoices in the Update payment method/bank account list type in the same procedure.
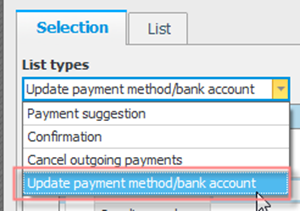
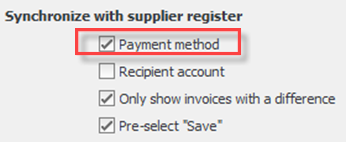
With this list type, you can synchronize the payment method with the payment method that is registered in the Supplier register. You are also able to manually update the payment method or use the Find and replace button.
International payments
Via Open Banking you can make both domestic and international payments from your bank account in the local currency (SEK account in Sweden, NOK account in Norway, EUR account in Finland).
In other words, with Global Pay you can make payments from your account in your local currency (company currency). In the payment suggestion in the Outgoing payments procedure you can see which payments are made via Global Pay under the Global Pay column.
Clicking the Load provided exchange rate and bank charge button  in the function menu loads the current (live) exchange rate and bank charge per payment. The exchange rate and bank charge is shown under the Provided exchange rate and Provided bank charge columns for each payment.

You can also schedule a payment (within 30 days) via Global Pay in the following circumstances:
- The company account uses one of the following currencies: EUR, NOK, SEK, DKK (not available for currency accounts)
- The payment is in one of the following currencies: EUR, NOK, SEK, DKK, GBP, USD (more currencies are planned to be added)
- The payment must be approved within 12 hours or the same day (before 23:59). If this is not done, the payment will be canceled by the bank and you will be required to cancel the payment manually in Monitor ERP.
Please note! The sooner you add the payment, the cheaper it will be (lower exchange rate can be offered).
For payments in another currency that has not been mentioned above, you are only able to put the current date as the payment date.
Read more about Global Pay here.
Signing payments
When you approve your payment suggestion, a question will appear asking if you wish to sign (approve) the selected payments. Signing is done through BankID. If your bank is DNB or you have the setting that payments are signed on the bank’s webpage, you will be redirected to the webpage so you can sign.

Please note that even if you have signed in Monitor ERP, another user may be required to countersign via online banking. This depends on the framework for signing your company has set up with the bank.
When countersigning, the following person signs via online banking. The exception is SEB and Nordea that do not support countersigning via Open Banking. If countersigning is needed with this bank, we recommend making outgoing payments via File pay (ISO),
Once the signing has been approved, a payment confirmation is shown in Monitor ERP.
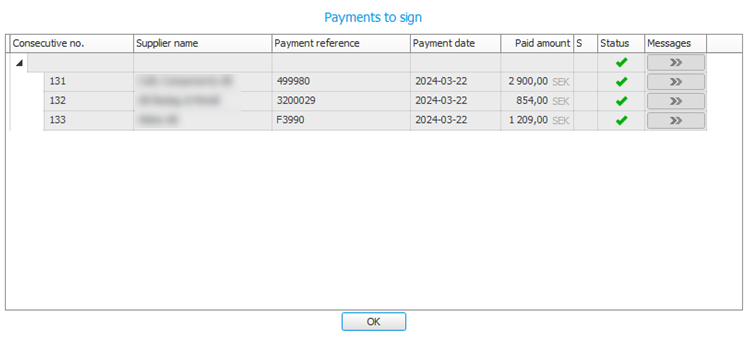
If the payment has a green tick under Status, it means that the payment has gone to the bank. If there is a yellow warning or a red cross in the Status column, it means that something has gone wrong and the payment has not gone to the bank. Under the Message button you can see what is stopping the payment from being sent to bank. For individual payments e.g. this can occur with OCR/reference number checks (read more in the section below). These payments need to be canceled and the issue must be resolved (e.g. enter OCR/Reference number on the supplier invoice) before sending the payment again.
If you have Swedbank or Sparebank1 and use Open Banking, please note that all new payees must be signed the first time you make a payment to them. Swedbank requires an extended BankID to be able to sign new recipients of payment. You can extend your BankID via online banking or going to your local branch.
There is a limit of 70 characters for payment references when making batch payments of debit invoices containing deductions for credit invoices. This applies to payments to the same supplier with the same payment date. The limit applies to the total number of characters in the payment reference for all supplier invoices in the same batch.
OCR/reference number checks
When making an outgoing payment via Open Banking, a check is carried out whether the recipient of the payment requires an OCR/reference number. If this number is missing, the payment of the invoice is stopped and is excluded from the payment order that is forwarded to the bank. You then need to cancel the invoice payment in the Outgoing payment procedure, or change the status to resend in the Print transaction list. You then enter the invoice’s OCR/reference number in the Register supplier invoice procedure and pay the invoice again.
Credit invoices
Credit invoices are managed differently when paying via Open Banking. Since sending credit invoices is not supported via PSD2, the system automatically makes an automatic set-off between the debit and credit invoice, so the payment order that is sent to the bank is the net amount between the two. As reference information for the payment, the system sends both the debit and the credit invoice's reference to the recipient of the payment.

If the debit invoice contains an OCR number, only the debit invoice’s OCR number is sent as reference to the recipient of the payment (with a deduction for the credit invoice). When confirming the system will automatically match both the debit and the credit invoice.
International payments
With File pay (ISO) you can make international payments via your currency account or use Global Pay.
Via Open Banking you can make both payments from your bank account in the local currency (company currency), meaning that you can make both domestic and international payments from your account in your local currency (SEK account in Sweden, NOK account in Norway, EUR account in Finland).
In payment method in Bank settings you can choose whether Global Pay should be used by default for international payments.
In the payment suggestion in the Outgoing payments procedure you can see/select which payments should be made via Global Pay under the Global Pay by ticking/unticking the checkbox.
Clicking the Load provided exchange rate and bank charge button in the function menu loads the current (live) exchange rate and bank charge per payment. The exchange rate and bank charge is shown under the Provided exchange rate and Provided bank charge columns for each payment.

You can also schedule a payment (within 30 days) via Global Pay in the following circumstances:
- The company account uses one of the following currencies: EUR, NOK, SEK, DKK (not available for currency accounts)
- The payment is in one of the following currencies: EUR, NOK, SEK, DKK, GBP, USD (more currencies are planned to be added)
- The payment must be approved within 12 hours or the same day (before 23:59). If this is not done, the payment will be canceled by the bank and you will be required to cancel the payment manually in Monitor ERP.
Please note! The sooner you add the payment, the cheaper it will be (lower exchange rate can be offered).
For payments in another currency that has not been mentioned above, you are only able to put the current date as the payment date.
Read more about Global Pay here.
Signing payments
When you approve your payment suggestion, a question will appear asking if you wish to sign (approve) the selected payments. Signing of payments is done via online banking. If any payment files need countersigning, this is also done via online banking.
Tip! As payments are signed through the bank, you can make things easier by adding a link to your bank’s website in the Payment method tab in the Bank settings procedure. The website will then automatically open when you create an outgoing payment.
The Bank account info desktop component
There is a desktop component for bank integration which you can add to your desktop.
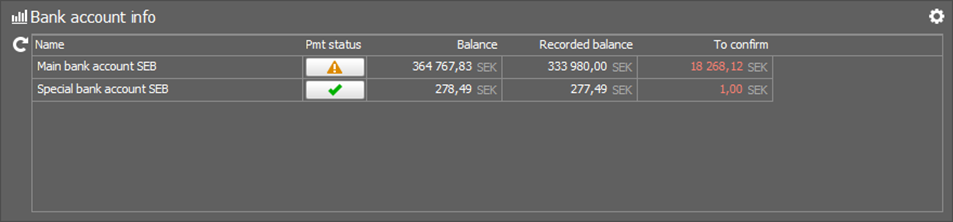
The Bank account info desktop component shows the balance of the bank accounts, the balance in the general ledger, and the balance of not confirmed payments. The bank account balance is loaded from the bank every night, but you can also load your current balance via the Update button  . Please note that certain banks have limits on how many times balances can be loaded per day.
It may also be necessary to restart Monitor ERP for the bank to load and to be able to configure the desktop component’s settings.
Please note! Cash Pool – Zero Balancing with Danske Bank limits the function regarding displaying balance in the desktop component.
In the To confirm column, you can see the balance of payments which have not yet been confirmed. By double-clicking on the bank account, you can be redirected to the Manage bank transactions procedure to confirm the payments.
In the desktop component you can also monitor ordered payments. The Payment status button shows information about the payments which have been sent to the bank.
 OK – no problems reported with the payments that have been ordered for payment (waiting to be paid).
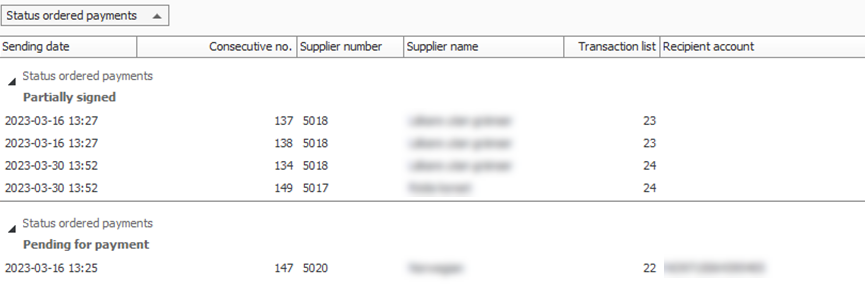
 Warning – there are ordered payments which are partially signed and are waiting to be countersigned via online banking.
 Error – there are ordered payments that have failed to be sent to the bank.
By clicking the button, you will be redirected to Status of ordered payments in the Accounts payable list where you are able to see more information.
Every morning, a bank statement is loaded from the bank, i.e. an overview of everything that has happened with the account. Confirmation of the payments is done in the Manage transactions via bank integration tab in the Manage bank transactions procedure. You can also be redirected to confirmation by double-clicking on the bank account in the Bank account info desktop component.
If you have activated the Automatic confirmation of payments setting, the payments are automatically matched and reported. This occurs every night when bank statements are loaded from the bank. Only records which could not be matched automatically over night need to be managed. We recommend that you do not have the setting Automatic confirmation of payment activated the first time using Bank integration.
Normally, Monitor ERP loads bank transactions from the bank between 07:00-09:00. This is the case for all banks except Swedbank (08:00-09:00) and Handelsbanken (07:15-09:00). Prior to the transactions being loaded, the system checks whether the payment details have been filled out. If the information is missing (due to a delay from the bank’s side), the system will wait and try to download the transactions again an hour later. This is repeated on an hourly basis until the transactions are ready to be downloaded. When the download is delayed, a notification is sent to the users entered under Notify when error occurs explaining why there aren’t any records to confirm. It is therefore important that you have entered users under the Notify when error occurs button under the Bank integration tab, in the Bank settings procedure so that they receive these notifications.
In the Bank account info desktop component you will find the Latest enrichment made column which shows the date and time that the bank account’s transactions were last enriched. This information helps you quickly see whether an account is ready to retrieve transactions or whether a delay in data enrichment may be the reason why transactions are missing. This check is done per account, giving a better overview and making it easier to spot deviations.
By clicking the Load transactions button  , the bank transactions (bank statement) are loaded and matched automatically to both accounts payable and accounts receivable.
![]()
You are also able to match manually via drag and drop. When you save in the procedure, all matched records are confirmed and recorded. Any remaining records will stay there until the next time you load the bank statement. All records that have been confirmed via this procedure will be automatically loaded as reconciled in the Bank reconciliation procedure.
With the Exclude check box, you can create an exception for a record in the bank statement so that it is not confirmed/recorded. This can be useful if you e.g. intend to record the payment manually (on the side of this procedure), or if the payment has already been recorded.
An excluded record is not shown again when you load the bank statement the next time.
For a short period of time, outgoing payment transactions may be shown that are missing necessary reference information and can therefore not automatically be matched to accounts receivable. These are outgoing payment transactions that have been ordered via ISO file before you began using bank integration.
International payment records via Global Pay
As the records are loaded from the bank, a bookkeeping basis showing proof of payment information is automatically attached as a PDF. Use the  button in the Documents column in Payment records in period to view the document. This PDF is automatically saved as a document to the voucher which is created during the confirmation reporting.
To be able to see the document, you must first register an inbox as active for Manage bank transactions. The inbox is registered in the Scan documents procedure under the Paths for inboxes tab. Under the Attachment types tab, you can also enter an attachment type for Global Pay. If you do not select an attachment type, the system will automatically select the attachment type at the very bottom of the list.
Payment records that do not relate to invoices
Transactions that do not relate to invoices, such as fees, interest or other payments, can be recorded at the same time as payments are confirmed. You can do this by either using the Posting button and entering the payment’s posting, or by selecting a bank transaction rule so that the posting is done automatically.
![]()
If there is a recurring transaction, a bank transaction rule can be used so that in the future they are matched and posted automatically when the records are loaded. Bank transaction rules can be created/updated by marking the transaction and clicking the Add/update bank transaction rule  in the function menu, or via the Bank transaction rules tab in the Bank settings procedure.
![]()
You can then enter a Reference for the bank transaction rule. If this reference appears on the transaction, the bank transaction rule will be used. You can also use a % as a wildcard character in the reference in order to match, e.g. by writing Bank charge%.
![]()
You can also register transactions from/to customers/suppliers that are missing in the ledger as an on account payment. The transaction is then recorded on the bank account but is registered at the same time as an on account payment in the ledger so that the transaction can be settled against other invoices. To create an on account payment, mark the record and click the Create on account record button  on the function menu. You then get to choose if it should be recorded on a customer or a supplier and which customer/supplier is concerned.
If information such as name, reference, exchange rate, currency code, and transaction amount is missing on a payment record, you are able to update the bank transaction details with the button in the function menu.
If you update information for a row that is a total row (e.g. bulk deposit via bankgiro), you then need to exclude the total row as the payment records are updated one at a time.
The procedure also has support for linking documents (PDF and TIFF files) to payment records. Use the Documents button  on the row for the bank transaction that you would like to link the document to.
Canceling an outgoing payment
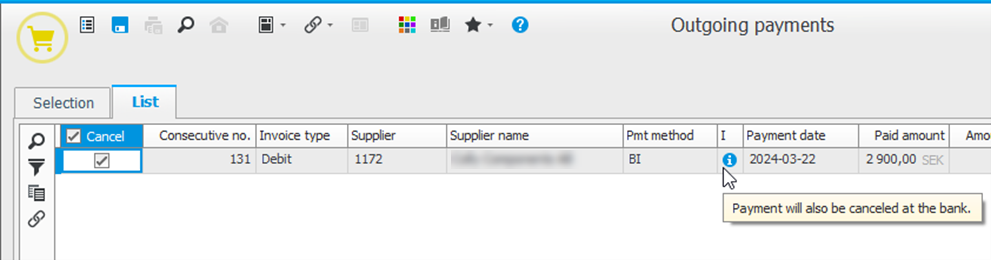
If you need to cancel an outgoing payment that has been sent to the bank but has still not been withdrawn from the bank account (future payment, the handling will be different depending on the bank you have. For most banks, it's the same as before, i.e. The payment order needs to be canceled via online banking and then canceled in Monitor ERP via the Cancel outgoing payment list type in the Outgoing payments procedure.
The exception is if you have made an outgoing payment via Open Banking and use the banks Nordea, SEB, or Swedbank. If this is the case, you are not able to cancel via online banking, but must cancel via Monitor ERP. When you save the cancellation in Monitor ERP, an automatic message is sent to the bank saying that the payment order has been canceled. Please note that it may take about a minute before the payment order has been removed in the internet bank.
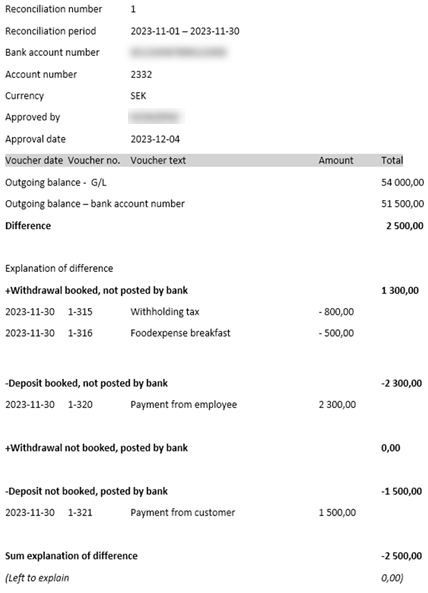
Bank reconciliation
With bank integration, the bank statement is integrated, giving a more effective bank reconciliation. Bank reconciliation is done via the Reconciliation via bank integration tab in the Bank reconciliation procedure.
The bank statement is automatically available in Monitor ERP and is reconciled against the bank transactions in the general ledger. Records on the bank statement that have been confirmed via bank integration are automatically marked as reconciled.
You can save the bank reconciliation and continue continue at a later time.
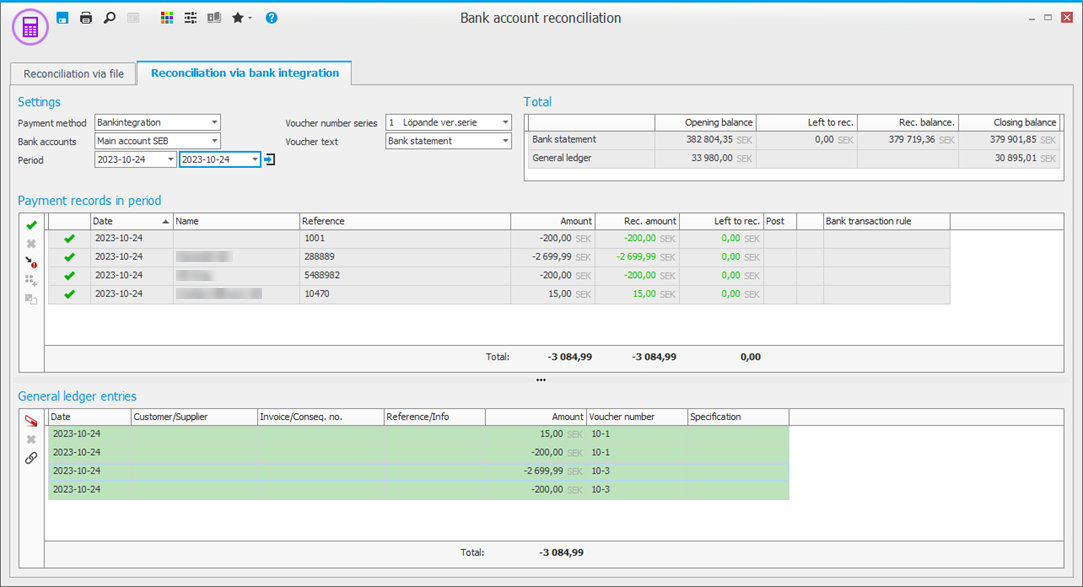
There is also support to match one or multiple rows in the bank statement to one or multiple entries in the general ledger. This is done via a function button on the menu. Firstly, mark a row in the statement that has not been matched, and then click the Match manually button  in the function menu. You will then see a window containing all the transactions from the bank and in the general ledger for that day. By marking records as reconciled, the total of the transactions from the bank can coincide with the total from the transactions in the general ledger. Click OK once the difference between the bank transactions and the general ledger is null. The marked records are then reconciled in the main window.
Under Settings mark for which period you want to reconcile the bank account. You can then approve and print your reconciliation report, which means that no changes can then be saved for the selected period. If you need to adjust anything, you can cancel the approved report. Approval and cancellation of bank reconciliation is done in the Approve/Print bank reconciliation procedure.